Welcome to a culinary journey that transcends time and place! Buttermilk rolls are not just a recipe; they are a heartfelt connection to generations of kitchens, filled with the warmth of family gatherings and the joy of shared meals. This recipe invites you to embrace the magic of baking, offering a delightful combination of soft, fluffy rolls that are perfect for any occasion. In this article, we will explore why these rolls are so beloved, break down the ingredients, provide expert tips, and share variations that cater to every palate. So preheat your oven and let’s dive into the world of Buttermilk Rolls!
Why You’ll Love This Recipe
Buttermilk rolls are more than just delicious; they are a celebration of flavor and texture. Here are five compelling reasons to fall in love with this recipe:
- Perfect texture: These rolls achieve a delicate balance of softness and slight chewiness, making them irresistible.
- Rich flavor: The addition of buttermilk imparts a subtle tang that enriches the taste, making each bite a joy.
- Versatile pairing: Whether served with soups, stews, or as a base for sliders, these rolls complement a variety of dishes.
- Quick and easy: With just a few simple steps, you’ll have freshly baked rolls on your table in under two hours.
- A family tradition: Baking these rolls can become a cherished family activity, creating lasting memories in the kitchen.
Ingredients Breakdown
Understanding your ingredients is crucial for baking success. Here’s a detailed breakdown of what you need for the perfect buttermilk rolls:
- All-purpose flour (3½ cups): The foundation of the rolls. You can substitute with whole wheat flour for a healthier option, but it may alter the texture.
- Active dry yeast (2¼ tsp): Essential for leavening. Make sure it’s fresh for the best results.
- Granulated sugar (¼ cup): Adds a hint of sweetness and helps activate the yeast.
- Salt (1 tsp): Balances the sweetness and enhances flavor.
- Buttermilk (1 cup, at room temperature): Provides moisture and tang. If you don’t have buttermilk, you can substitute with regular milk mixed with vinegar or lemon juice.
- Melted butter (¼ cup, plus more for brushing): Contributes richness and flavor. Use unsalted butter to control the saltiness of the rolls.
- Large egg (1, at room temperature): Binds the ingredients and adds richness.
- Vegetable oil (for greasing): Prevents the dough from sticking to the bowl during rising.
How to Make Buttermilk Rolls
Follow these step-by-step instructions to create your own batch of fluffy buttermilk rolls:
- Step 1: Activate the Yeast In a small bowl, combine warm buttermilk (about 100–110°F) with 1 tablespoon of sugar. Sprinkle in the yeast and stir gently. Let sit for 5–10 minutes until foamy—this means the yeast is active.
- Step 2: Mix the Dough In a large bowl or the bowl of a stand mixer, combine the flour, remaining sugar, and salt. Add the yeast mixture, melted butter, and egg. Mix until a sticky dough forms.
- Step 3: Knead the Dough Knead the dough for 8–10 minutes by hand or 5–6 minutes with a dough hook until smooth and elastic. Add a little flour as needed, but keep the dough soft—not dry.
- Step 4: First Rise Form the dough into a ball and place it in a greased bowl. Cover with a towel or plastic wrap and let rise in a warm spot for 1 to 1½ hours, or until doubled in size.
- Step 5: Shape the Rolls Punch down the dough and divide it into 12–15 equal pieces. Roll each into a ball and place in a greased 9×13-inch baking dish, spaced slightly apart.
- Step 6: Second Rise Cover loosely and let rise again for 30–45 minutes, until puffy and touching.
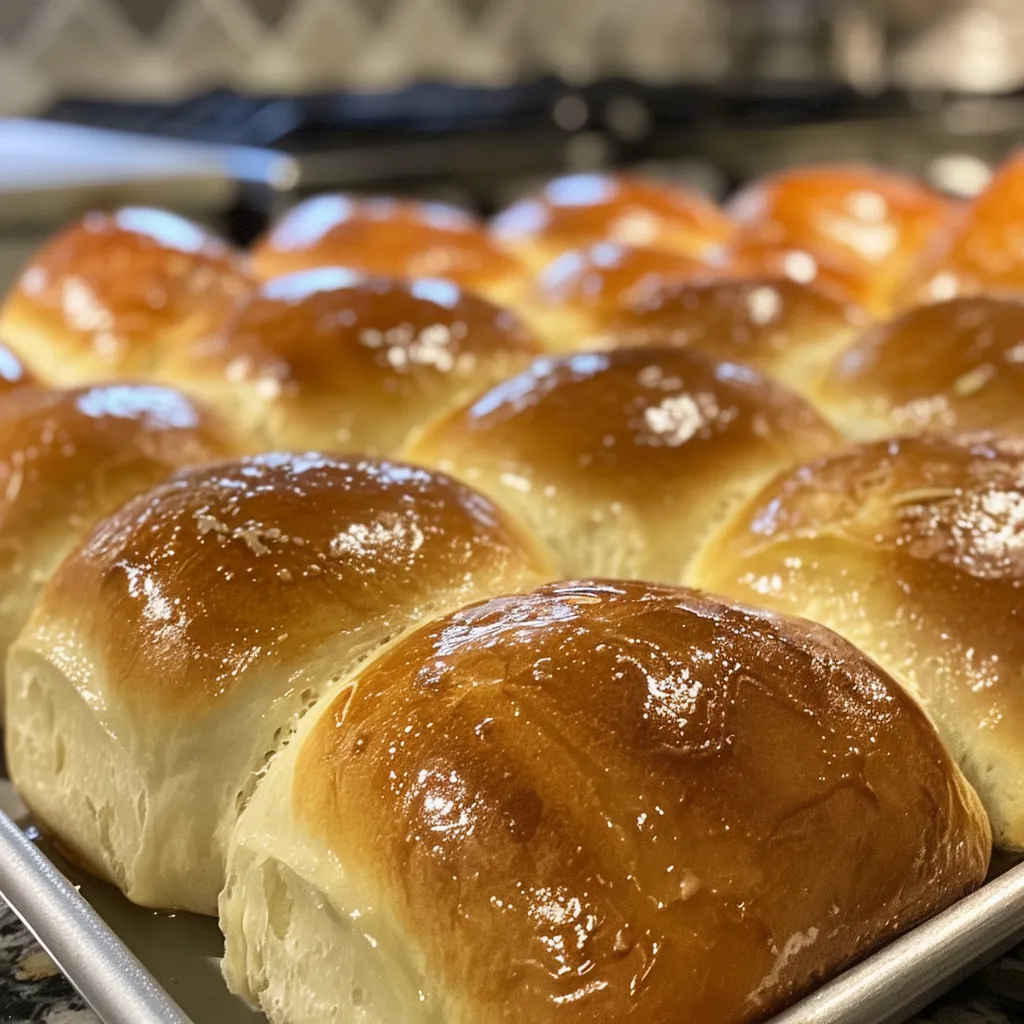
- Step 7: Bake Preheat the oven to 375°F (190°C). Bake rolls for 18–22 minutes, or until golden brown on top and cooked through.
- Step 8: Brush with Butter Remove from oven and brush the warm rolls with melted butter for a shiny, flavorful finish.
- Step 9: Serve Let rolls cool slightly and serve warm, with butter, jam, or your favorite spread.
Pro Tips for Perfect Rolls
To ensure your buttermilk rolls turn out perfect, consider the following expert insights:
- Use room temperature ingredients: Let your buttermilk and egg sit out for about 30 minutes before starting to ensure even mixing.
- Don’t rush the yeast: Allow the yeast to activate fully for the best rise.
- Monitor dough consistency: The dough should be slightly tacky but not overly sticky; adjust flour as necessary.
- Ideal rising conditions: If your kitchen is cool, you can create a warm environment by turning on the oven for a minute, then turning it off and placing the dough inside.
- Brush with butter immediately: Brushing with melted butter right after baking keeps the rolls moist and adds flavor.
- Experiment with shapes: Don’t be afraid to try different shapes for the rolls, such as knots or crescents, to add variety.
- Make-ahead option: You can prepare the dough and refrigerate it overnight for a quick bake in the morning.
Common Mistakes and Troubleshooting
Even the best bakers can face challenges. Here are some common mistakes and how to fix them:
- Dense rolls: If your rolls are too dense, it may be due to using expired yeast or not allowing enough time for the dough to rise.
- Dry rolls: Overbaking can lead to dryness. Keep an eye on them towards the end of the baking time.
- Sticky dough: If the dough is too sticky, add a bit more flour gradually until you achieve the right consistency.
- Cold rolls: If your rolls don’t rise well, check the temperature of your kitchen; it may be too cold for the yeast to activate properly.
Delicious Variations
Feeling adventurous? Here are some fun variations to customize your buttermilk rolls:
- Cheddar and Chive Rolls: Add 1 cup of shredded cheddar cheese and ¼ cup chopped chives to the dough for a savory twist.
- Cinnamon Sugar Rolls: Add cinnamon to the dough and roll the shaped rolls in cinnamon sugar before the second rise for a sweet treat.
- Herb-Infused Rolls: Mix in 1 tablespoon of dried herbs such as rosemary or thyme for an aromatic flavor.
- Whole Wheat Version: Substitute half of the all-purpose flour with whole wheat flour for a heartier roll.
Storage and Make-Ahead Instructions
To make your buttermilk rolls last longer:
- Storing leftovers: Keep leftover rolls in an airtight container at room temperature for up to 2 days or in the refrigerator for up to a week.
- Freezing rolls: For longer storage, freeze baked rolls in a zip-top bag for up to 3 months. Reheat in the oven at 350°F (175°C) for about 10-15 minutes.
- Make-ahead option: Prepare the dough and refrigerate overnight, then shape and let rise before baking the next day.
Frequently Asked Questions (FAQs)
Here are some common questions regarding buttermilk rolls:
- Can I use regular milk instead of buttermilk? Yes! Mix 1 cup of milk with 1 tablespoon of vinegar or lemon juice and let it sit for 5-10 minutes to mimic buttermilk.
- What if my dough isn’t rising? Ensure your yeast is fresh, and try placing the dough in a warm area.
- How can I make these rolls vegan? Substitute buttermilk with plant-based milk and vinegar, and replace the egg with a flax egg or applesauce.
- Can I add fillings to the rolls? Absolutely! Consider adding chocolate chips, nuts, or dried fruit for a delicious variation.
- What’s the best way to serve these rolls? Serve them warm with butter, honey, or your favorite jam.
- How do I know when the rolls are done baking? They should be golden brown on top and sound hollow when tapped on the bottom.
- Can I make these rolls in advance? Yes! You can prepare the dough and refrigerate it overnight, then bake in the morning.
- What should I do if the rolls are too salty? This could happen if too much salt is added. To balance, serve with a sweet spread.
Nutritional Tips and Dietary Adaptations
For those looking to adjust their rolls to fit dietary needs:
- Gluten-free option: Use a gluten-free flour blend to make these rolls gluten-free.
- Lower calorie version: Reduce the sugar and butter content for a lighter option.
- Protein boost: Add a scoop of protein powder to the flour mixture for added nutrition.
Equipment Recommendations
Having the right tools makes baking easier and more enjoyable:
- Mixing bowls: A set of varying sizes is essential for mixing and rising.
- Stand mixer: This can save time and energy when kneading the dough.
- Baking dish: A 9×13-inch pan is perfect for shaping and baking rolls.
- Thermometer: A kitchen thermometer ensures your ingredients are at the right temperature for optimal results.
Serving Suggestions
These buttermilk rolls are incredibly versatile. Here are a few serving ideas:
- With soups and stews: Pair them with your favorite soup for a comforting meal.
- As sliders: Use them for mini sandwiches filled with meats, cheeses, or veggies.
- Breakfast rolls: Serve them warm with butter and jam for a delightful breakfast treat.
The journey of creating these buttermilk rolls is not just about baking; it’s about connecting with tradition, family, and the joy of sharing food. So gather your loved ones, roll up your sleeves, and embark on this flavorful adventure. Happy baking!
Buttermilk Rolls
Ingredients
Dough
- 3.5 cups all-purpose flour (plus more for kneading)
- 2.25 tsp active dry yeast (1 packet)
- 0.25 cup granulated sugar
- 1 tsp salt
- 1 cup buttermilk (at room temperature)
- 0.25 cup unsalted butter (melted, plus more for brushing)
- 1 large egg (at room temperature)
- 2 tbsp vegetable oil (for greasing)
Instructions
- Activate yeast by combining warm buttermilk with 1 tbsp sugar, then add yeast and let sit until foamy.
- Mix flour, remaining sugar, and salt; add yeast mixture, melted butter, and egg. Mix into a sticky dough.
- Knead dough until smooth and elastic, about 8–10 minutes by hand. Let rise in a warm spot for 1–1.5 hours.
- Punch down dough, divide into 12–15 pieces, shape into balls, and place in a greased baking dish. Let rise for 30–45 minutes.
- Preheat oven to 375°F (190°C). Bake rolls for 18–22 minutes until golden. Brush with melted butter and serve warm.