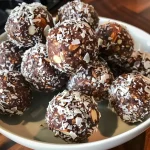
Welcome, fellow culinary explorers! Today, we’re diving into the world of no-bake desserts with a recipe that’s sure to tantalize your taste buds and spark your creativity. These No-Bake Chocolate Oat Cups are not just a quick and easy snack; they are a delightful fusion of flavors and textures that will transport you to a cozy kitchen filled with warmth and love. With just a few simple ingredients, you can whip up a batch of these delicious cups in under 5 minutes. So, grab your apron, and let’s embark on this sweet adventure!
Why You’ll Love This Recipe
There are countless reasons to adore these no-bake chocolate oat cups, and here are just a few:
- Quick and Easy: With minimal prep time, you can enjoy these cups in a flash—perfect for busy days when you crave something sweet!
- Nutritious Ingredients: Packed with rolled oats and peanut butter, these cups are not only delicious but also provide you with energy and nutrients.
- Customizable: You can easily modify the recipe by adding your favorite mix-ins, such as nuts, dried fruit, or even different nut butters.
- Perfect for Any Occasion: Whether it’s a snack for the kids, a dessert for a gathering, or a treat for yourself, these cups fit the bill!
- Vegan-Friendly: With the right sweeteners and nut butter, these treats can easily be made vegan, delighting everyone at the table.
Detailed Ingredient Breakdown
Let’s explore the ingredients that make up these delightful no-bake chocolate oat cups. Each component plays a critical role in achieving that perfect flavor and texture.
- 1 cup rolled oats: Old-fashioned rolled oats provide the ideal base for these cups. They offer a hearty texture and a great source of fiber.
- 2 tablespoons cocoa powder: For that rich chocolate flavor, use unsweetened cocoa powder. It brings depth without added sweetness.
- 2 tablespoons honey or maple syrup: Sweeten your cups naturally! Honey or maple syrup adds a touch of sweetness and binds the mixture together.
- 2 tablespoons peanut butter: Creamy peanut butter not only adds flavor but also helps hold the cups together. You can substitute almond butter for a different flavor profile.
- 2 tablespoons milk (any type): This helps achieve the right consistency. Feel free to use almond milk, oat milk, or any other milk alternatives.
- Optional: dark chocolate chips or chopped nuts: Add these for an extra layer of flavor and crunch.
Pro Tips for Success
Want your no-bake chocolate oat cups to be a hit? Here are some expert tips to ensure success:
- Mix Thoroughly: Ensure all ingredients are well combined for a uniform flavor and texture.
- Chill for Best Results: While you can enjoy them immediately, chilling in the fridge for about 10 minutes helps them firm up perfectly.
- Use Quality Ingredients: Opt for high-quality cocoa powder and nut butters for the best flavor.
- Experiment with Flavors: Don’t hesitate to try different nut butters or sweeteners to find your favorite combination.
- Silicone Molds: Using silicone molds makes it easier to remove the cups without breaking them.
- Store in an Airtight Container: To keep your oat cups fresh, store them in an airtight container in the fridge.
- Make Ahead: These cups can be made a few days in advance, making them a perfect grab-and-go snack.
- Check Consistency: If the mixture feels too dry, add a splash more milk; if too wet, sprinkle in a few more oats.
Common Mistakes and Troubleshooting
Even the best chefs encounter hiccups! Here’s how to avoid common mistakes:
- Too Dry: If your mixture is crumbly, add a bit more sweetener or milk until it holds together.
- Not Crispy Enough: Ensure you’re using rolled oats, as quick oats can lead to a mushy texture.
- Overmixed: Mix just until combined! Overmixing can lead to a dense texture.
- Not Enough Sweetness: Adjust to your taste by adding more honey or maple syrup if desired.
Variations to Try
Get creative with your no-bake chocolate oat cups! Here are some enticing variations:
- Nutty Delight: Add chopped walnuts or pecans for a crunchy texture.
- Fruity Twist: Toss in dried cranberries or raisins for a sweet and chewy surprise.
- Chocolate Chip Heaven: Mix in dark chocolate chips for an extra hit of chocolate goodness.
- Spiced Up: Add a pinch of cinnamon or a dash of vanilla extract for added warmth and flavor.
Storage and Make-Ahead Instructions
To keep your oat cups fresh and delicious:
- Refrigerate: Store in an airtight container in the fridge for up to one week.
- Room Temperature: If you prefer, these cups can also be stored at room temperature for a day, but for longer freshness, refrigeration is best.
Frequently Asked Questions
Here are some questions I often receive about this recipe:
- Can I use different nut butters besides peanut butter? Yes! Almond butter or sunflower seed butter works wonderfully.
- How do I ensure the oat base holds together? Ensure the mixture is well combined and moist enough. A little extra sweetener can help.
- What’s the best way to melt chocolate? Use a double boiler or microwave in short bursts, stirring in between.
- Can these oat cups be stored at room temperature? They can be, but for best results, keep them in the fridge.
- How long do they last? They can last up to one week in the refrigerator.
- Can I add protein powder? Absolutely! It can enhance the nutritional profile without compromising texture.
- What if I don’t have cocoa powder? You can substitute with carob powder for a different flavor.
- Can I freeze these cups? Yes, they freeze well! Just thaw in the fridge before enjoying.
Nutritional Tips and Dietary Adaptations
These no-bake chocolate oat cups are not only delicious but can also be modified to fit various dietary needs:
- Gluten-Free: Ensure the oats are certified gluten-free.
- Vegan: Use maple syrup instead of honey and dairy-free milk.
- Lower Sugar: Reduce the amount of sweetener for a healthier option.
- Protein Boost: Add protein powder or seeds like chia or flaxseed for extra nutrition.
Equipment Recommendations
To make the process smoother, here are some handy tools:
- Mixing Bowl: A large bowl for combining all your ingredients.
- Silicone Molds: For easy removal of your cups.
- Spatula: A sturdy spatula will help you mix and scoop.
- Measuring Cups and Spoons: Precision is key to achieving the perfect flavor balance.
Serving Suggestions
These delightful cups can be enjoyed in various ways:
- As a Snack: Perfect for a quick, energizing bite in the afternoon.
- For Dessert: Serve with a dollop of whipped cream or a scoop of ice cream for a decadent treat.
- Breakfast Option: Top with yogurt and fresh fruits for a healthy breakfast alternative.
So, there you have it! A comprehensive guide to making the most scrumptious no-bake chocolate oat cups. With their rich flavor, delightful texture, and endless possibilities for customization, you’re bound to find joy in every bite. Remember, food is not just about sustenance; it’s about connection, adventure, and the stories we create along the way. Happy cooking, my friends!
5-Minute No-Bake Chocolate Oat Cups
Ingredients
Dry ingredients
- 1 cup rolled oats
- 2 tablespoons cocoa powder
Wet ingredients
- 2 tablespoons honey or maple syrup
- 2 tablespoons peanut butter
- 2 tablespoons milk (any type)
Optional toppings
- dark chocolate chips or chopped nuts (optional)
Instructions
- Mix oats and cocoa powder in a bowl.
- Add honey, peanut butter, and milk; stir until well combined and thick.
- Spoon mixture into small cups or silicone molds.
- Top with chocolate chips or nuts if desired.
- Chill for 10 minutes or enjoy immediately.