Author

Jack

Browsing

Indulge in Autumn: The Ultimate Pumpkin Donuts Recipe

As the leaves turn and the air becomes crisp, there’s nothing quite like the warm, inviting scent of freshly baked pumpkin donuts wafting through your kitchen. These Baked Pumpkin Donuts with Maple Glaze are more than just a treat; they are a celebration of the season, bringing together rich flavors and comforting textures that encapsulate the essence of fall. In this guide, I’ll take you through every step of crafting these delightful donuts, ensuring you can share them with family and friends, or simply enjoy them yourself with a steaming cup of coffee.

Why You’ll Love This Recipe

  • Cozy flavors: The combination of pumpkin, warm spices, and rich maple creates a nostalgic flavor profile that captures the spirit of autumn.
  • Baked, not fried: Enjoy a healthier version of donuts without sacrificing taste or texture. These baked donuts are fluffy and light!
  • Easy to make: This recipe is straightforward, requiring minimal effort and ingredients, perfect for both beginner and seasoned bakers.
  • Versatile toppings: While the maple glaze is delicious, you can customize your donuts with various toppings or glazes to suit your taste.
  • Perfect for gatherings: Bring these donuts to your next family gathering, brunch, or potluck, and watch them disappear!

Ingredient Breakdown

Let’s dive into the ingredients that make these pumpkin donuts so special. Below is a detailed list along with possible substitutions to cater to your dietary needs.

  • All-purpose flour: 2 cups. For a gluten-free option, substitute with a gluten-free flour blend.
  • Baking powder: 1 ½ teaspoons. Essential for a fluffy texture.
  • Pumpkin pie spice: 1 ½ teaspoons. You can make your own by mixing cinnamon, nutmeg, and allspice.
  • Salt: ¾ teaspoon. Enhances the flavors of the other ingredients.
  • Baking soda: ¼ teaspoon. Helps the donuts rise.
  • Unsalted butter: ½ cup (melted). If dairy-free, use coconut oil or a dairy-free butter substitute.
  • Brown sugar: 1 cup (packed). For a deeper flavor, consider using dark brown sugar.
  • Eggs: 2 large. For a vegan option, you can replace eggs with flax eggs or unsweetened applesauce.
  • Canned pumpkin puree: 1 cup. Fresh pumpkin can also be used if you’re feeling adventurous.
  • Vanilla extract: 2 teaspoons. A must for adding depth to your donuts.

How to Make Pumpkin Donuts

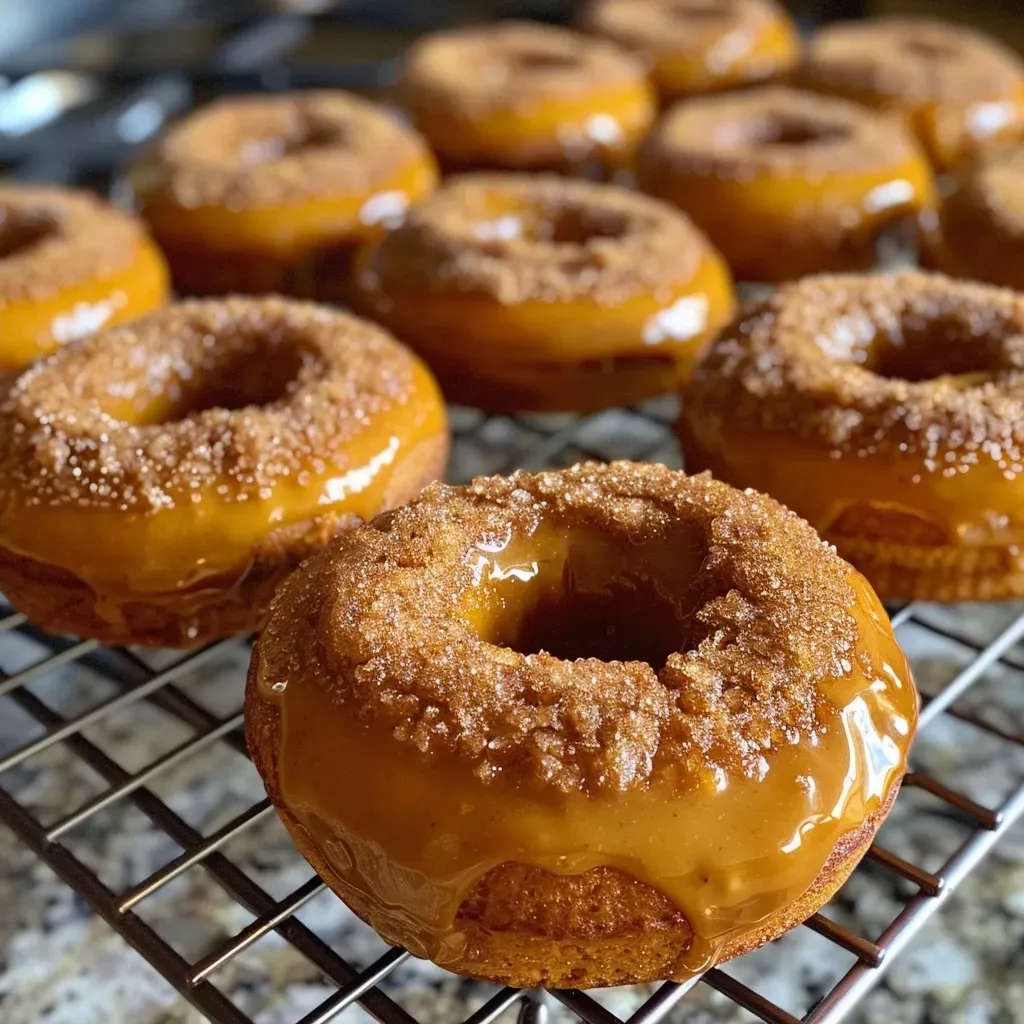
Close-up of baked pumpkin donuts with a glossy maple glaze, showcasing their texture.

Ready to bake? Follow these simple steps to create your delicious pumpkin donuts:


Digital Kitchen Scale

★ Recommended Kitchen Tool

Digital Kitchen Scale

Make this recipe even easier with a quality Digital Kitchen Scale — a must-have kitchen staple!


🛒 See Deals on Amazon →

As an Amazon Associate, we earn from qualifying purchases.
  1. Preheat your oven to 400°F (200°C). Coat a donut pan with nonstick spray.
  2. In a large bowl, combine the flour, baking powder, pumpkin pie spice, salt, and baking soda.
  3. In another bowl, beat the melted butter and brown sugar together until well combined, about 1-2 minutes. Add the eggs one at a time, mixing well after each addition. Stir in the pumpkin puree and vanilla extract.
  4. Gradually add the dry ingredients to the wet mixture, stirring until just combined. Avoid over-mixing.
  5. Scoop the batter evenly into the prepared donut pan, filling each cavity about 2/3 full.
  6. Bake for 10-12 minutes, or until the donuts are golden brown and spring back when touched.

Creating the Maple Glaze

While your donuts are baking, let’s prepare the **maple glaze** that will elevate your treats:

  1. In a small saucepan, heat the maple syrup over medium heat until reduced to about ½ cup, which should take around 5 minutes.
  2. Whisk in the melted butter, vanilla extract, and salt until combined.
  3. Gradually whisk in the confectioners’ sugar until the glaze is smooth and glossy.

Finishing Touches

Once the donuts are done baking, allow them to cool in the pan for about 10 minutes. Then, dip the tops into the maple glaze, letting any excess drip off. Place them on a wire rack to allow the glaze to set before serving.

Pro Tips for Perfect Pumpkin Donuts

  • Don’t overmix: Mix until just combined for the fluffiest donuts.
  • Cool before glazing: Ensure the donuts are cool enough so the glaze doesn’t melt off.
  • Experiment with spices: Add a pinch of nutmeg or ginger for a unique twist.
  • Use a piping bag: For a neat way to fill your donut pan, consider using a piping bag or a ziplock with the corner cut off.
  • Try different pans: If you don’t have a donut pan, you can use a muffin tin to create donut holes.
  • Monitor baking time: Every oven is different; check your donuts a minute or two before the minimum time.
  • Store properly: Keep leftovers in an airtight container to maintain freshness.
  • Share the joy: These donuts make great gifts for friends and family during the holidays!

Common Mistakes and Troubleshooting

If you encounter any hiccups, fear not! Here are solutions to common issues:

  • Dense donuts: This usually means the batter was overmixed. Mix just until combined.
  • Donuts sticking to the pan: Ensure you properly grease the pan or consider using parchment paper for easy removal.
  • Too sweet glaze: If the glaze is overly sweet for your taste, reduce the amount of confectioners’ sugar or add a dash of salt.

Variations to Try

Feel free to mix things up! Here are some variations to consider:

  • Chocolate Chip Pumpkin Donuts: Fold in some mini chocolate chips for an indulgent treat.
  • Maple Bacon Donuts: Top with crumbled bacon for a sweet and savory combination.
  • Spiced Apple Cider Glaze: Replace the maple glaze with a glaze made from apple cider for a different flavor profile.
  • Nut Butter Drizzle: Drizzle with your favorite nut butter for added richness and flavor.

Storage and Make-Ahead Instructions

Want to prepare your pumpkin donuts in advance? Here’s how:

  • Make-ahead: Prepare the batter a day in advance, store it in the refrigerator, and bake fresh donuts when ready.
  • Storing: Keep baked donuts in an airtight container at room temperature for up to 3 days or refrigerate for up to a week.
  • Freezing: Freeze unglazed donuts for up to 2 months. Thaw and glaze before serving.

FAQs About Pumpkin Donuts

  • Can I use fresh pumpkin instead of canned? Yes, fresh pumpkin puree can be substituted; just ensure it’s well-drained.
  • Can I make these donuts vegan? Absolutely! Use flax eggs and a dairy-free butter substitute.
  • What can I use instead of a donut pan? A muffin tin will work in a pinch, though the shape will differ.
  • How do I know when my donuts are done? They should be golden brown and spring back when touched.
  • Can I make these donuts gluten-free? Yes, use a gluten-free flour blend that measures cup for cup.
  • How should I store leftovers? Keep them in an airtight container at room temperature or refrigerate.
  • Can I freeze these donuts? Yes, freeze unglazed donuts for later enjoyment!
  • How long do these donuts last? They are best enjoyed fresh but will last for about 3 days at room temperature.

Nutrition Tips and Dietary Adaptations

For healthier adaptations, consider these tips:

  • Reduce sugar: Cut back on the brown sugar or use a sugar substitute.
  • Whole grain option: Substitute half of the all-purpose flour with whole wheat flour.
  • Low-calorie glaze: Use a lighter syrup or homemade glaze with less sugar.

Equipment Recommendations

To make your pumpkin donuts, here are a few recommended tools:

  • Donut pan: Invest in a quality nonstick donut pan for perfect shapes.
  • Mixing bowls: Have a few different sized bowls for mixing ingredients.
  • Whisk: A sturdy whisk will help combine your wet and dry ingredients effortlessly.
  • Measuring cups and spoons: Precision is key in baking!

Serving Suggestions

Serve your pumpkin donuts warm or at room temperature. Here are a few ideas to elevate your serving:

  • Pair with coffee: These donuts are delightful with a cup of coffee or chai latte.
  • Serve with whipped cream: A dollop of whipped cream can add a luxurious touch.
  • Garnish with nuts: Top with crushed nuts for added texture and flavor.

Now that you have everything you need to create these delicious Baked Pumpkin Donuts with Maple Glaze, it’s time to gather your ingredients and start baking. I hope these donuts bring you the warmth and joy of fall, just as they do for me. Happy baking!

Baked Pumpkin Donuts with Maple Glaze

Prep Time 15 minutes
Cook Time 12 minutes
Total Time 27 minutes
Servings 12 pieces
Calories 250
Enjoy these warm, spiced pumpkin donuts topped with a sweet maple glaze, perfect for fall treats or special mornings.

Ingredients

Dough

  • 2 cups all-purpose flour
  • 1 1/2 teaspoons baking powder
  • 1 1/2 teaspoons pumpkin pie spice
  • 3/4 teaspoon kosher salt
  • 1/4 teaspoon baking soda
  • 1/2 cup unsalted butter (melted)
  • 1 cup light brown sugar (packed)
  • 2 large eggs
  • 1 cup canned pumpkin puree
  • 2 teaspoons vanilla extract
  • 3/4 cup maple syrup
  • 1 1/2 tablespoons unsalted butter
  • 1 teaspoon vanilla extract
  • 1/4 teaspoon kosher salt
  • 1/4 cup confectioners’ sugar

Instructions 

  • Preheat oven to 400°F (200°C). Spray donut pan with nonstick spray.
  • Mix flour, baking powder, pumpkin pie spice, salt, and baking soda in a bowl.
  • Beat butter and sugar until combined, add eggs, pumpkin, vanilla, then mix in dry ingredients. Fill donut pan and bake 10-12 minutes.
  • Simmer maple syrup until reduced to 1/2 cup, then whisk in butter, vanilla, salt, and confectioners’ sugar to make glaze.
  • Cool donuts 10 minutes, dip tops in glaze, and let set before serving.

Notes

Store glazed donuts in an airtight container for up to 2 days for best freshness.
Calories: 250kcal
Cost: $15
Course: Dessert
Cuisine: American
Keyword: pumpkin

Experience the Comfort of Homemade Vegetable Barley Soup

Welcome to a culinary journey that invites you to savor the beauty of home-cooked meals! Today, we’re diving into the heartwarming world of vegetable barley soup, a dish that’s not just a recipe but a warm embrace in a bowl. This slow cooker vegetable barley soup is packed with vibrant vegetables, wholesome barley, and aromatic herbs, making it the perfect companion for chilly days or cozy gatherings. Let’s explore why this recipe should be your go-to for comfort food that nourishes both body and soul.

Why You’ll Love This Recipe

  • Effortless Preparation: With minimal chopping and a simple method, this slow cooker recipe lets you set it and forget it, freeing you up to enjoy your day.
  • Nutritious Ingredients: Packed with vegetables like carrots, celery, and sweet potatoes, this soup is not only filling but also bursting with vitamins and minerals.
  • Customizable Flavors: You can easily adapt the recipe to suit your taste or dietary preferences, making it suitable for everyone at your table.
  • Perfect for Meal Prep: This soup stores beautifully, making it an excellent make-ahead option for busy weeks or unexpected guests.
  • Plant-Based Goodness: As a completely vegetarian dish, it’s a healthy choice for plant-based eaters and anyone looking to incorporate more vegetables into their diet.

Ingredients Breakdown

Let’s take a closer look at what you’ll need for this vegetable barley soup and some potential substitutions to cater to your tastes:

  • 1 yellow onion (chopped): A foundational flavor; substitute with shallots for a milder taste.
  • 2 carrots (cut into 1/2-circles): Sweet and vibrant; feel free to swap with parsnips for a twist.
  • 2 stalks celery (chopped): Adds crunch; you can omit if you’re not a fan.
  • 1 medium sweet potato (peeled and cut into 3/4-inch pieces): For natural sweetness; can be replaced with regular potatoes or butternut squash.
  • 4 garlic cloves (minced): Essential for depth; use garlic powder if fresh isn’t available.
  • 1 1/2 cups frozen green beans: Convenient and nutritious; fresh green beans work well too.
  • 3/4 cup pearl barley: This whole grain is hearty; for gluten-free options, try brown rice.
  • 1 teaspoon paprika: Adds warmth; smoked paprika can enhance the flavor even more.
  • 1 teaspoon dried oregano: A classic herb that complements the soup; basil or thyme can be used as alternatives.
  • 3/4 teaspoon dried thyme: Adds a lovely aroma; feel free to replace with Italian seasoning.
  • 1/2 teaspoon salt: Adjust to taste; you can use low-sodium varieties to control sodium intake.
  • 1/2 teaspoon ground pepper: For a hint of spice; white pepper is a subtle alternative.
  • 1 can (14 ounces) petite diced tomatoes: Provides acidity and richness; you can use fresh tomatoes in season.
  • 6 cups low sodium vegetable broth: The backbone of the soup; homemade broth elevates the flavor.
  • 2 cups water: Adjust based on desired thickness of the soup.
  • 1/4 cup minced flat-leaf parsley: A fresh finish; cilantro or basil can also complement this dish.

How to Make This Soup: Step-by-Step Instructions

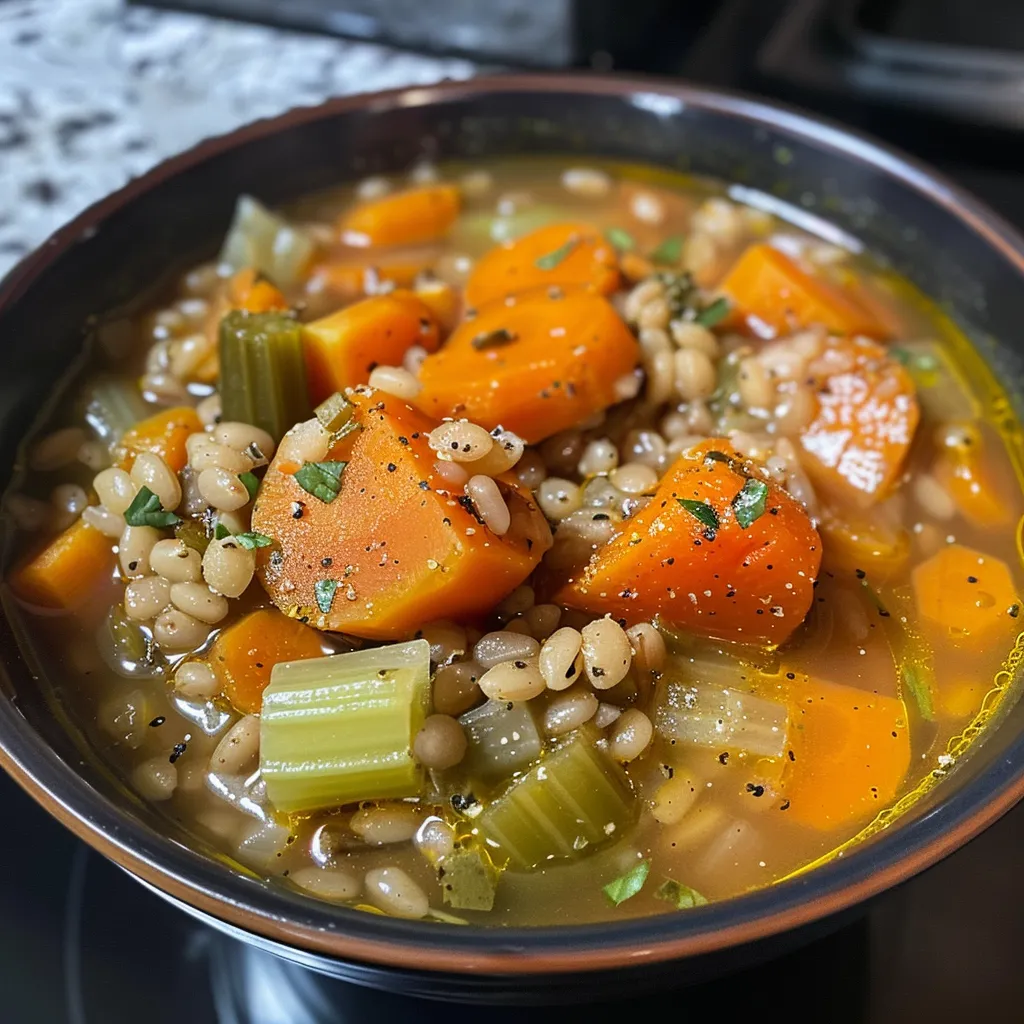
Close-up view of a bowl of Vegetable Barley Soup with fresh ingredients visible.
  1. In a large (6-quart) slow cooker, combine all of the ingredients except for the parsley.
  2. Cover and cook on LOW for about 8 hours or until the barley is tender.
  3. Stir in the parsley just before serving for a burst of freshness.

Pro Tips for Perfecting Your Vegetable Barley Soup

  • Soak the barley: If you have time, soak the pearl barley in water for a few hours to reduce cooking time and enhance its texture.
  • Adjust the consistency: If you prefer a thicker soup, use less water or blend a portion of the soup before serving.
  • Herb freshness: Add fresh herbs just before serving to maintain their vibrant flavors.
  • Spice it up: Experiment with different spices like cumin or chili flakes for a unique twist.
  • Storage tips: Store leftovers in an airtight container in the fridge for up to five days, or freeze for up to three months.
  • Reheating: Reheat on the stove with a splash of broth or water to maintain creaminess.
  • Presentation: Serve with a sprinkle of fresh parsley and a drizzle of olive oil for an elegant touch.
  • Garnish ideas: Top with croutons or a dollop of yogurt for added texture and flavor.

Common Mistakes and Troubleshooting

Even the best of us can stumble in the kitchen! Here are some common pitfalls and how to avoid them:


Professional Chef Knife Set

★ Recommended Kitchen Tool

Professional Chef Knife Set

Make this recipe even easier with a quality Professional Chef Knife Set — a must-have kitchen staple!


🛒 Shop This Tool →

As an Amazon Associate, we earn from qualifying purchases.
  • Overcooking the vegetables: Ensure you add delicate vegetables like green beans later in the cooking process to prevent mushiness.
  • Not seasoning enough: Taste and adjust seasoning before serving; the flavors develop as it cooks.
  • Using old barley: Fresh ingredients yield the best results; check your barley for freshness.
  • Too watery: If your soup is too thin, let it simmer uncovered for a while to thicken.

Variations to Try

Get creative with your vegetable barley soup! Here are four delicious variations to consider:

  • Mediterranean Delight: Add olives, sun-dried tomatoes, and feta for a tangy twist.
  • Curried Version: Stir in curry powder and coconut milk for a fragrant, spicy soup.
  • Mexican Inspired: Toss in corn, black beans, and cumin for a southwestern flair.
  • Asian Fusion: Incorporate soy sauce, ginger, and bok choy for an Asian-inspired version.

Storage and Make-Ahead Instructions

This soup is a fantastic make-ahead meal. Here’s how to store it:

  • Refrigeration: Keep in an airtight container for up to five days in the refrigerator.
  • Freezing: Allow the soup to cool completely before transferring it to freezer-safe containers. It can last for up to three months.
  • Thawing: Thaw overnight in the fridge before reheating.

Frequently Asked Questions

  • Can I make this soup without a slow cooker?: Absolutely! You can make it on the stovetop. Simply adjust the cooking time to about 30-45 minutes until the barley is tender.
  • Is barley a healthy grain?: Yes! Barley is rich in fiber, vitamins, and minerals, making it a nutritious addition to your diet.
  • How can I make this soup gluten-free?: Substitute barley with brown rice or quinoa for a gluten-free version.
  • Can I add meat to this soup?: Certainly! Adding diced chicken or turkey will enhance the protein content and flavor.
  • How do I know when the barley is cooked?: The barley should be tender but still slightly chewy when done. Taste for doneness.
  • Can I use canned vegetables?: While fresh vegetables are preferred for flavor, canned vegetables can be used in a pinch. Just reduce the cooking time.
  • What should I serve with vegetable barley soup?: This soup pairs beautifully with crusty bread, a fresh salad, or a hearty sandwich.
  • Can I use frozen vegetables?: Yes! Frozen vegetables work well, making it convenient and quick to prepare.

Nutritional Tips and Dietary Adaptations

This recipe is packed with wholesome ingredients, making it a nutritious choice for many dietary needs. Here are some tips:

  • Vegan-friendly: This soup is already vegan, making it suitable for plant-based diets.
  • Low-sodium option: Use low-sodium vegetable broth and skip added salt for heart-healthy eating.
  • High-fiber boost: The barley and vegetables provide fiber, promoting digestive health.
  • Protein-packed: Consider adding lentils or beans for an extra protein boost.

Essential Equipment Recommendations

To make your vegetable barley soup, you’ll need:

  • Slow Cooker: A reliable slow cooker is key to developing rich flavors over time.
  • Chopping Knife: A good knife makes prep work quick and easy.
  • Cutting Board: Essential for safe and efficient vegetable prep.
  • Measuring Cups and Spoons: Accurate measurements ensure balanced flavors.

Serving Suggestions

Here are some delightful ways to serve your vegetable barley soup:

  • With Crusty Bread: Serve alongside a warm, crusty baguette for a rustic touch.
  • Salad Pairing: A light mixed greens salad can balance the meal beautifully.
  • Garnish with Fresh Herbs: A sprinkle of fresh parsley or a drizzle of olive oil enhances presentation and flavor.
  • Accompany with Cheese: A side of cheese or cheese toast can add richness to your meal.

Conclusion: A Journey Worth Taking

As you ladle this warm and hearty vegetable barley soup into bowls, remember that you’re not only nourishing your body but also creating connections with those around you. Each spoonful tells a story of flavors, cultures, and cherished moments shared with loved ones. So, gather around the table, dive into this delightful dish, and let it transport you to a world of comfort and joy. Happy cooking!

Vegetable Barley Soup Recipe (Slow Cooker)

Prep Time 15 minutes
Cook Time 8 hours
Total Time 8 hours 15 minutes
Servings 6 servings
Calories 250
A hearty and nutritious vegetable barley soup perfect for slow cooking, packed with wholesome ingredients and flavor.

Ingredients

Vegetables

  • 1 piece yellow onion (chopped)
  • 2 pieces carrots (cut into 1/2-circles)
  • 2 stalks celery (chopped)
  • 1 medium sweet potato (peeled and cut into 3/4-inch pieces)
  • 4 cloves garlic (minced)
  • 1.5 cups frozen green beans
  • 3/4 cup pearl barley
  • 1 teaspoon paprika
  • 1 teaspoon dried oregano
  • 3/4 teaspoon dried thyme
  • 1/2 teaspoon salt
  • 1/2 teaspoon ground pepper
  • 1 14-ounce can petite diced tomatoes
  • 6 cups low sodium vegetable broth
  • 2 cups water
  • 1/4 cup minced flat-leaf parsley

Instructions 

  • Combine all ingredients except parsley in a slow cooker.
  • Cook on LOW for about 8 hours until barley is tender.
  • Stir in parsley and serve.

Notes

This soup is a perfect comforting meal loaded with vegetables and wholesome grains.
Calories: 250kcal
Cost: $15
Course: Soup
Cuisine: Vegetarian
Keyword: Vegetables

A Journey into Flavor: Discovering Pumpkin Panna Cotta

As the leaves turn golden and the air becomes crisp, there’s no better time to explore the comforting flavors of autumn. One delightful way to celebrate this season is through a luscious dessert that embodies the essence of fall: pumpkin panna cotta. This creamy, velvety treat, infused with warm spices and the rich taste of pumpkin, is not just a dessert—it’s a story waiting to be tasted. Join me, Jack Miller, as we delve into the world of pumpkin panna cotta, a dish that brings the heartwarming flavors of autumn right to your table.

Why You’ll Love This Recipe

This pumpkin panna cotta recipe isn’t just about indulging your sweet tooth; it offers a multitude of reasons to fall in love with it. Here are five compelling benefits:

  • Simple Ingredients: Made with common pantry staples, this recipe invites you to create a gourmet dessert without the fuss.
  • Versatile Serving Options: Whether for a cozy family dinner or a festive gathering, it’s a show-stopper at any occasion.
  • Healthier Dessert Choice: With natural pumpkin puree and reduced sugar, it offers a guilt-free indulgence compared to many traditional desserts.
  • Make-Ahead Convenience: Perfect for busy hosts, this panna cotta can be prepared in advance, saving you time on the big day.
  • A Taste of Tradition: Infused with autumn spices, it evokes the warmth of family gatherings and cherished memories.

Ingredients for Pumpkin Panna Cotta

To make this delightful pumpkin panna cotta, you’ll need the following ingredients:


Digital Kitchen Scale

★ Recommended Kitchen Tool

Digital Kitchen Scale

Make this recipe even easier with a quality Digital Kitchen Scale — a must-have kitchen staple!


🛒 View on Amazon →

As an Amazon Associate, we earn from qualifying purchases.
  • 200 g milk
  • 2 1/4 teaspoons gelatin powder
  • 200 g whipping cream
  • 120 g pumpkin puree
  • 125 g brown sugar
  • 2 teaspoons vanilla extract
  • 1 tablespoon ground cinnamon
  • 1/2 teaspoon ground nutmeg
  • 1/2 teaspoon ground ginger
  • 1/2 teaspoon ground allspice
  • 1/4 teaspoon ground cloves

How to Make Pumpkin Panna Cotta

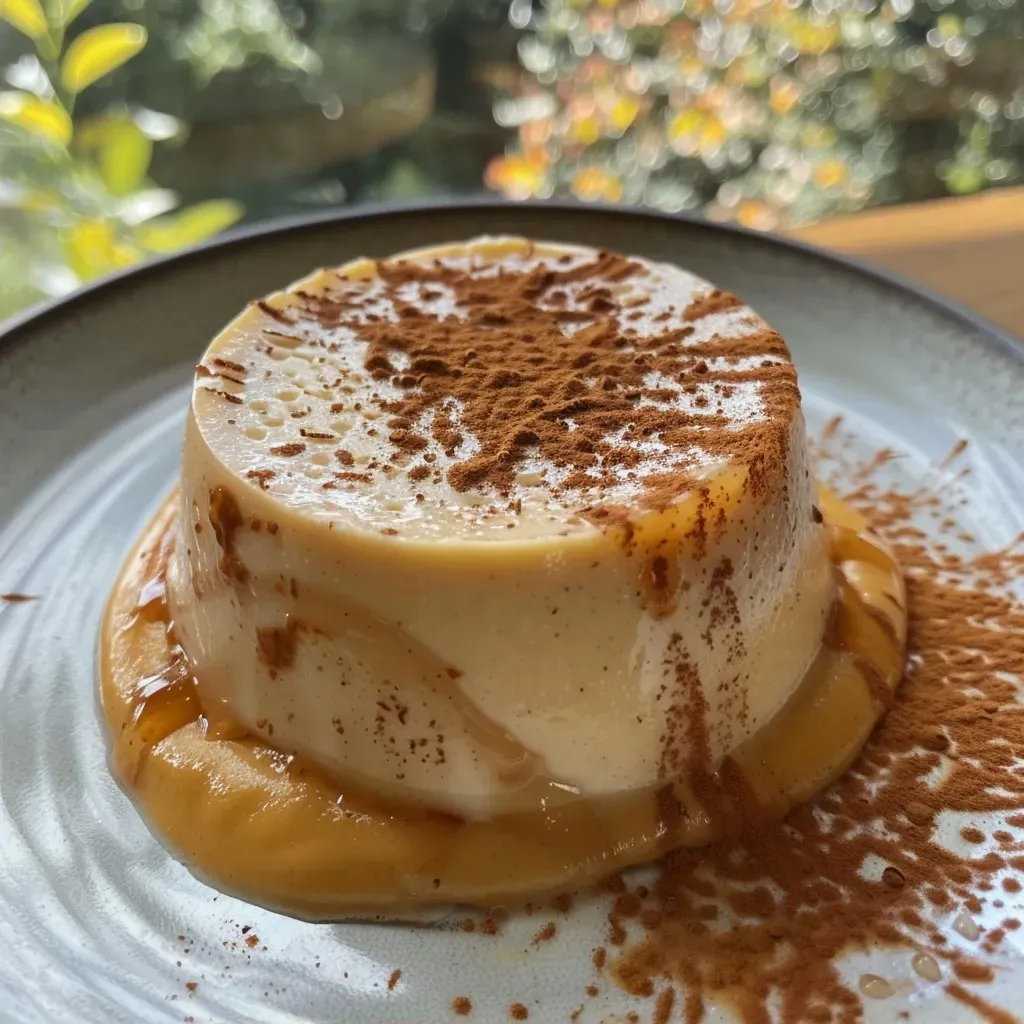
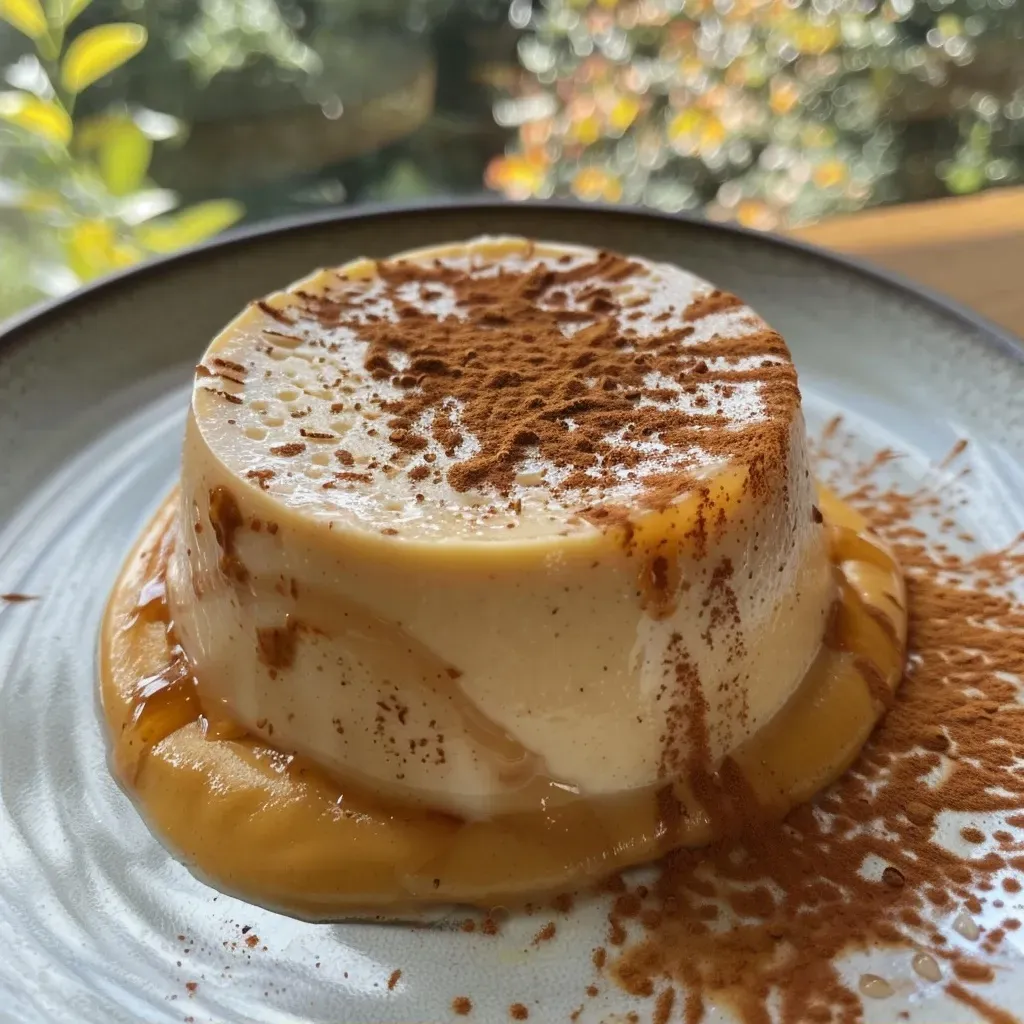
Close-up view of a creamy Pumpkin Panna Cotta with a smooth texture.

Creating this pumpkin panna cotta is a straightforward process that yields impressive results. Follow these steps for a perfect dessert:

  1. Fill a small bowl with cold milk and sprinkle the gelatin powder on top. Let the gelatin bloom for 5 minutes until it absorbs the milk and becomes a gel-like mass.
  2. Meanwhile, in a small pot, whisk together the whipping cream, pumpkin puree, brown sugar, vanilla extract, cinnamon, nutmeg, ginger, allspice, and cloves until smooth. Bring this mixture to a simmer on low-medium heat. Once small bubbles start forming at the surface, stir in the bloomed gelatin and milk mixture until it completely dissolves.
  3. Pour the pumpkin panna cotta into serving glasses and chill in the fridge for about 30 minutes or longer until set. The texture should be firm to the touch but a little wobbly when shaken.

Pro Tips for Perfect Pumpkin Panna Cotta

To ensure your panna cotta turns out flawlessly, consider these expert insights:

  • Bloom Gelatin Properly: Always bloom gelatin in cold liquid to ensure even distribution and perfect texture.
  • Temperature Control: When simmering your mixture, avoid boiling as it can affect the gelatin’s setting ability.
  • Chill Time: Allow ample time for chilling. Ideally, let it set for at least 4 hours or overnight for the best results.
  • Flavor Adjustments: Feel free to tweak the spices based on your taste preference; more ginger or less cinnamon can personalize your panna cotta.
  • Garnish Creatively: Top with whipped cream, caramel sauce, or toasted nuts for added texture and flavor.
  • Experiment with Infusions: Try adding a splash of bourbon or rum for an adult twist on the classic recipe.
  • Presentation Matters: Use clear serving glasses to showcase the beautiful layers of your panna cotta.
  • Storage Tips: Store any leftovers covered in the fridge for up to three days, although it’s best enjoyed fresh.

Common Mistakes and Troubleshooting

Even the best chefs make mistakes! Here are some common issues you might encounter and how to fix them:

  • Separation of Layers: If your panna cotta separates, it may be due to uneven mixing of gelatin. Ensure it is fully dissolved before pouring into molds.
  • Texture Problems: If it’s too firm, you may have added too much gelatin. Next time, reduce the amount slightly.
  • Too Sweet or Spicy: Adjust sugar and spice levels to your liking in future batches; everyone has different taste preferences.
  • Chilling Issues: Make sure your refrigerator is at the right temperature; too warm can prevent proper setting.

Variations to Explore

While the classic pumpkin panna cotta is divine on its own, consider these variations to spice things up:

  • Maple Pumpkin Panna Cotta: Replace brown sugar with maple syrup for a richer flavor.
  • Chocolate Pumpkin Panna Cotta: Add melted dark chocolate to the mixture for a decadent twist.
  • Spiced Rum Pumpkin Panna Cotta: Stir in a splash of spiced rum for a festive touch.
  • Vegan Pumpkin Panna Cotta: Substitute dairy cream with coconut cream and gelatin with agar-agar for a plant-based version.

Storage and Make-Ahead Instructions

This pumpkin panna cotta is perfect for make-ahead dessert planning:

  • Refrigeration: Store covered in the fridge for up to 3 days.
  • Freezing: For longer storage, freeze in airtight containers; however, the texture may change upon thawing.
  • Preparation: Prepare up to 2 days in advance for stress-free entertaining.

Frequently Asked Questions

If you have questions about making pumpkin panna cotta, you’re not alone! Here are some commonly asked questions:

  • Can I use fresh pumpkin instead of canned? Yes! Just make sure it’s well-pureed and cooked until soft.
  • What can I substitute for gelatin? Agar-agar is a great vegan alternative that works similarly.
  • How long does panna cotta take to set? Typically, it takes about 4 hours to set fully in the refrigerator.
  • Can I add other flavors? Absolutely! Try incorporating flavors like orange zest or cardamom for a unique twist.
  • What’s the best way to serve it? Serve chilled in clear glasses, garnished with whipped cream and a sprinkle of cinnamon.
  • Can I make this dairy-free? Yes! Use coconut milk or almond milk in place of dairy options.
  • How can I tell if it’s set? It should be firm to the touch but slightly jiggle when moved.
  • What are some good toppings? Consider caramel sauce, crushed cookies, or fresh fruit for added flavor and texture.

Nutritional Tips and Dietary Adaptations

This pumpkin panna cotta can be enjoyed by many dietary preferences:

  • Lower Sugar Option: Use a sugar substitute like stevia or erythritol for a lower-calorie version.
  • Dairy-Free: Swap out dairy ingredients with plant-based alternatives.
  • Gluten-Free: Naturally gluten-free, making it suitable for those with gluten sensitivities.
  • High-Protein Variation: Add Greek yogurt to the mixture for an extra protein boost.

Equipment Recommendations

To make your pumpkin panna cotta effortlessly, consider having these kitchen tools on hand:

  • Mixing Bowls: For combining ingredients.
  • Whisk: Essential for ensuring a smooth mixture.
  • Small Saucepan: Ideal for heating the cream and spices.
  • Serving Glasses: Clear glasses showcase the beautiful layers of panna cotta.

Serving Suggestions

To elevate your dessert experience, try these serving suggestions:

  • Top with Whipped Cream: A dollop of freshly whipped cream adds a light, airy texture.
  • Garnish with Nuts: Sprinkle toasted pecans or walnuts for a crunchy contrast.
  • Drizzle with Caramel: A sweet caramel sauce adds richness and visual appeal.
  • Pair with Coffee: Serve alongside a warm cup of coffee or spiced chai for a cozy pairing.

Conclusion: A Sweet Adventure Awaits

As we wrap up this delicious exploration of pumpkin panna cotta, remember that food is more than just sustenance; it’s a gateway to nostalgia and shared experiences. With every creamy spoonful, you’re not just tasting a dessert; you’re savoring the stories of autumn, family gatherings, and culinary adventures. So gather your ingredients, invite some friends, and embark on this flavorful journey. Your taste buds will thank you!

Pumpkin Panna Cotta

Prep Time 10 minutes
Cook Time 15 minutes
Total Time 25 minutes
Servings 4 servings
Calories 250
A creamy and spiced dessert combining pumpkin and classic panna cotta for a delightful treat.

Ingredients

Dairy

  • 200 g milk
  • 200 g whipping cream

Pumpkin

  • 120 g pumpkin puree

Sweeteners & Spices

  • 125 g brown sugar
  • 2 teaspoons vanilla extract
  • 1 tablespoon ground cinnamon
  • 1/2 teaspoon ground nutmeg
  • 1/2 teaspoon ground ginger
  • 1/2 teaspoon ground allspice
  • 1/4 teaspoon ground cloves

Gelatin

  • 2 1/4 teaspoons gelatin powder (sprinkled over cold milk to bloom)

Instructions 

  • Sprinkle gelatin over cold milk and let bloom for 5 minutes.
  • Heat cream, pumpkin, sugar, vanilla, and spices until simmering; stir in gelatin until dissolved.
  • Pour into glasses and chill for 30 minutes until set.

Notes

Ensure the panna cotta is fully chilled before serving for best texture.
Calories: 250kcal
Cost: $12
Course: Dessert
Cuisine: Italian
Keyword: pumpkin

Embark on a Flavorful Journey with Apple Cheddar Grilled Cheese

Welcome, fellow culinary explorers! Brace yourself for a delectable adventure as we dive into the heartwarming world of the Apple Cheddar Grilled Cheese. Imagine the perfect fusion of sweet, crisp apples and sharp, creamy cheddar melting between two slices of toasted bread. This grilled cheese recipe isn’t just a meal; it’s a passport to fall flavors and cozy gatherings. Let’s uncover why this dish should be your go-to comfort food and explore the vibrant stories it tells.

Why You’ll Love This Recipe

This Apple Cheddar Grilled Cheese is more than just a sandwich; it’s a delightful culinary experience. Here are five compelling reasons to fall in love with this recipe:

  • Flavor Harmony: The sweet-tart apples perfectly complement the rich sharpness of cheddar, creating a balanced flavor profile that dances on your palate.
  • Easy to Make: With just a handful of ingredients, this recipe is quick to prepare, making it perfect for busy weekdays or leisurely weekends.
  • Versatile Ingredients: Feel free to experiment with different types of bread, cheeses, and apples. The possibilities are endless!
  • Comfort Food with a Twist: It’s a unique twist on the classic grilled cheese, bringing warmth and nostalgia while still feeling fresh and exciting.
  • Perfect for All Occasions: Whether it’s a cozy lunch, a snack on a chilly day, or a delightful dinner, this sandwich fits every mood.

Ingredients Breakdown

Let’s gather what you need to create this mouthwatering dish:


Digital Kitchen Scale

★ Recommended Kitchen Tool

Digital Kitchen Scale

Make this recipe even easier with a quality Digital Kitchen Scale — a must-have kitchen staple!


🛒 Shop This Tool →

As an Amazon Associate, we earn from qualifying purchases.
  • 1/2 apple (thinly sliced, I used Honeycrisp): This variety offers a perfect balance of sweetness and tartness, enhancing the sandwich’s flavor.
  • 2 slices sourdough (or bread of choice): Sourdough’s tangy notes and sturdy structure are ideal for a crispy exterior and soft interior.
  • ~1/3-1/2 cup fresh grated/shredded cheddar cheese (or about 2-4 slices): Freshly shredded cheese melts beautifully, providing that gooey goodness we all crave.
  • 1-2 tablespoons butter (divided): Butter adds richness and helps achieve that golden-brown crust.

Substitutions

If you’re looking to switch things up, consider these fantastic substitutions:

  • Gluten-Free Bread: Use gluten-free bread to make this sandwich suitable for gluten-sensitive eaters.
  • Different Cheeses: Try Gruyère or Brie for a more gourmet twist, or even a dairy-free cheese for a vegan option.
  • Other Apples: Experiment with Granny Smith for a tart kick or Fuji for extra sweetness.
  • Herbed Butter: Mix herbs into your butter for added flavor—think rosemary or thyme for an earthy touch.

How to Make Apple Cheddar Grilled Cheese

A side view of a Fall Apple Cheddar Grilled Cheese sandwich with visible apple slices and melted cheese.

Ready to embark on this culinary journey? Let’s make your sandwich!

Step 1: Prepare the Apples

Heat about ½-1 tablespoon of butter (or oil) over medium heat. Add the apple slices and cook for 2-3 minutes on each side until they are browned and softened. This step enhances their natural sweetness and adds depth to your sandwich.

Step 2: Assemble the Sandwich

Butter or oil one side of each slice of bread. On the unbuttered side of one slice, layer the cooked apple slices followed by the cheese. Top it with the second slice of bread, buttered side facing out.

Step 3: Grill to Perfection

Add another tablespoon of butter or oil to the pan over medium heat. Place the sandwich in the pan with the cheese side down. Cook for 3-5 minutes until the bread is golden brown and the cheese is melty. Flip and repeat for the other side. If you’re using thick sourdough, press down with a spatula for even cooking.

Step 4: Slice and Serve

Once both sides are beautifully grilled, remove from heat, slice, and serve your grilled cheese warm. Enjoy the delightful aroma and flavors!

Pro Tips for the Best Apple Cheddar Grilled Cheese

To elevate your grilled cheese game, keep these expert tips in mind:

  • Use Fresh Ingredients: Freshly grated cheese melts better and tastes richer than pre-shredded varieties.
  • Control the Heat: Keep your pan on medium heat to ensure the bread toasts without burning while the cheese melts.
  • Press Down: Use a spatula or potato masher to press the sandwich down while cooking, ensuring even melting and toasting.
  • Experiment with Spices: Sprinkle a pinch of cinnamon or nutmeg on the apples for an extra layer of flavor that screams autumn.
  • Let it Rest: Allow your sandwich to sit for a minute after grilling before slicing. This helps the cheese set slightly, making it less gooey and easier to eat.
  • Pair with Dips: Serve with a side of honey or spicy mustard for dipping, adding a fun twist to each bite.
  • Toast the Bread: If you’re feeling adventurous, toast the bread before assembling for an added crunch.
  • Go Gourmet: Add a layer of caramelized onions or crispy bacon for a gourmet touch that will impress your guests.

Common Mistakes and Troubleshooting

Even the best culinary explorers can hit a snag. Here’s how to avoid common pitfalls:

  • Burnt Bread: If your bread is burning before the cheese melts, lower the heat and give it more time.
  • Undercooked Apples: Ensure apples are adequately cooked for the best flavor and texture. If they’re still hard, consider cooking them longer.
  • Too Much Cheese: While it’s tempting to pile on the cheese, too much can lead to a messy sandwich. Stick to the recommended amounts for the best results.
  • Skipping the Butter: Don’t skip the butter or oil! It’s essential for achieving that golden-brown crust.

Delicious Variations to Try

Feeling adventurous? Here are some delightful variations of the classic Apple Cheddar Grilled Cheese:

  • Spicy Apple & Cheddar: Add a layer of jalapeños or red pepper flakes for a spicy kick that contrasts with the sweetness of the apples.
  • Caprese Twist: Incorporate fresh basil and sliced tomatoes for a Caprese-inspired version that’s fresh and vibrant.
  • Breakfast Delight: Add a fried egg on top for a breakfast sandwich that’s perfect for starting your day off right.
  • Maple Glazed Apple: Drizzle maple syrup over the apples before grilling for a sweet touch that enhances the overall flavor.

Storage and Make-Ahead Instructions

Want to prepare ahead of time? Here’s how to store and make this sandwich in advance:

  • Storage: Keep any leftovers in an airtight container in the fridge for up to 3 days. Reheat in a skillet for the best texture.
  • Make-Ahead: Prepare the apple slices and cook them in advance. Assemble the sandwich just before grilling to ensure freshness.
  • Freezing: You can freeze ungrilled sandwiches. Wrap them tightly in plastic wrap and foil, then store them in the freezer for up to one month. Grill directly from frozen, adding extra cooking time.

Frequently Asked Questions

Here are some common questions about this delightful grilled cheese:

  • Can I use different types of cheese? Absolutely! Feel free to experiment with your favorite cheeses for unique flavors.
  • What’s the best bread for grilled cheese? Sourdough, whole grain, and even brioche work wonderfully. Choose one that suits your taste!
  • How do I ensure the cheese melts perfectly? Grate your cheese and let it come to room temperature before adding it to the sandwich.
  • Can I make this recipe vegan? Yes! Substitute dairy cheese with a vegan alternative and use plant-based butter.
  • What can I serve with this sandwich? Pair it with a side salad, soup, or even sweet potato fries for a complete meal.
  • How do I know when my sandwich is done? Look for a golden-brown exterior and melted cheese inside. If unsure, use a thermometer; the cheese should be around 160°F.
  • What can I do with leftover grilled cheese? Store leftovers in the fridge and reheat in a skillet or microwave. They’re still delicious the next day!
  • How can I make this dish more filling? Add protein like turkey or ham for a heartier sandwich.

Nutritional Tips and Dietary Adaptations

For a healthier version of this recipe, consider the following tips:

  • Whole Grain Bread: Opt for whole grain bread for added fiber and nutrients.
  • Low-Fat Cheese: Use low-fat cheese options to cut down on calories while still enjoying that cheesy goodness.
  • Increase Veggies: Add spinach or arugula for a boost of vitamins and a touch of freshness.
  • Limit Butter: Use a light hand with butter or substitute with a cooking spray to reduce fat content.

Essential Equipment for Perfect Grilled Cheese

Here’s what you’ll need to make this delicious sandwich:

  • Non-Stick Skillet: A good non-stick skillet ensures easy flipping and even cooking.
  • Spatula: For flipping your sandwich perfectly without making a mess.
  • Grater: For shredding cheese fresh, which melts more smoothly than pre-packaged options.
  • Cutting Board: For slicing your apples and sandwich with ease.

Serving Suggestions

Now that you’ve mastered the art of the Apple Cheddar Grilled Cheese, here are some serving ideas:

  • With Tomato Soup: A classic pairing that brings comfort and warmth.
  • Side Salad: A simple green salad with vinaigrette complements the richness of the sandwich.
  • With Pickles: The acidity from pickles balances the fat of the cheese beautifully.
  • Fruit Platter: Serve with a side of seasonal fruits for a refreshing contrast.

In conclusion, the Apple Cheddar Grilled Cheese is more than just a sandwich; it’s a heartwarming experience that brings people together. With its flavorful ingredients and endless possibilities, this dish is bound to become a staple in your kitchen. So grab your apron, gather your ingredients, and let’s create some delicious memories!

Fall Apple Cheddar Grilled Cheese

Prep Time 5 minutes
Cook Time 10 minutes
Total Time 15 minutes
Servings 1 serving
Calories 350
A delicious twist on classic grilled cheese, featuring sweet apple slices and sharp cheddar for a cozy fall treat.

Ingredients

Main

  • 1/2 apple apple, thinly sliced (honey crisp)
  • 2 slices sourdough or bread of choice
  • ~0.33-0.5 cup fresh grated/shredded cheddar cheese (about 2-4 slices cheese)
  • 1-2 tablespoons butter, divided

Instructions 

  • Cook apple slices in ½-1 tablespoon butter over medium heat until browned and softened, about 2-3 minutes per side.
  • Butter one side of each bread slice. Layer apple slices and cheese on one slice, then top with the other.
  • Add another tablespoon of butter to a pan. Cook sandwich over medium heat for 3-5 minutes per side until golden, pressing down if needed.
  • Serve hot and enjoy your fall-inspired grilled cheese.

Notes

Use a firm apple variety like Honeycrisp for best flavor and texture.
Calories: 350kcal
Cost: $10
Course: lunch, Snack
Cuisine: American
Keyword: Apple, Cheddar, grilled cheese

As the leaves turn and the air grows crisp, the aroma of freshly baked pumpkin cake fills the kitchen, inviting us to gather around the table. This Pumpkin Cake with Maple Glaze isn’t just a dessert; it’s a warm hug on a cold day, a celebration of the season, and a delicious way to connect with family and friends. Join me, Jack, on this flavorful journey as we explore the rich spices, the creamy glaze, and the comforting essence of autumn in every bite.

Why You’ll Love This Recipe

  • Seasonal Delight: This pumpkin cake perfectly captures the essence of fall, making it an ideal treat for Thanksgiving or any cozy gathering.
  • Moist and Flavorful: The blend of spices and pumpkin puree ensures a cake that’s both moist and bursting with flavor.
  • Easy Preparation: With straightforward steps, this recipe is beginner-friendly yet impressive enough for seasoned bakers.
  • Versatile Serving Options: Whether served warm or at room temperature, this cake pairs beautifully with coffee, tea, or even as a dessert after dinner.
  • Maple Glaze Magic: The maple glaze adds a sweet finish that perfectly complements the spiced cake, transforming it into a standout dessert.

Ingredient Breakdown and Substitutions

Let’s dive into the ingredients that make this pumpkin cake a must-try, along with some thoughtful substitutions for dietary preferences.

  • All-Purpose Flour: 2 3/4 cups – This is the base of our cake. If you’re gluten-free, try a 1:1 gluten-free flour blend.
  • Ground Spices: 2 teaspoons ground cinnamon, 1 1/4 teaspoons nutmeg, 1 teaspoon ginger, and 1 teaspoon all-spice – These spices create that warm, autumnal flavor. Feel free to adjust based on your preference.
  • Baking Powder and Soda: 1/2 teaspoon baking powder and 1 1/2 teaspoons baking soda – Essential for leavening, ensuring a light texture.
  • Vegetable Oil: 1 cup – Provides moisture. Substitute with melted coconut oil for a different flavor.
  • Brown Sugar and Cane Sugar: 1 1/2 cups light brown sugar and 1 cup pure cane sugar – The combination adds depth and sweetness. You can use coconut sugar for a lower glycemic option.
  • Eggs: 4 large, room temperature – Vital for structure and moisture. For a vegan alternative, use flax eggs (1 tablespoon ground flaxseed + 2.5 tablespoons water per egg).
  • Pumpkin Puree: 1 (15-ounce) can – The star ingredient! Ensure you use pure pumpkin puree, not pumpkin pie filling.
  • Maple Syrup: 3 tablespoons – Adds richness to the glaze. Agave syrup works as a substitute.
  • Confectioners Sugar: 1 3/4 cups, sifted – For the glaze, adjust the amount depending on your desired thickness.
  • Pistachios: 3 tablespoons, chopped – For garnish. You can swap them for walnuts or omit them for a nut-free version.

Pro Tips for Baking Success

Here are some expert insights to ensure your pumpkin cake turns out perfectly every time:


Cake Decorating Set

★ Recommended Kitchen Tool

Cake Decorating Set

Make this recipe even easier with a quality Cake Decorating Set — a must-have kitchen staple!


🛒 See Deals on Amazon →

As an Amazon Associate, we earn from qualifying purchases.
  • Room Temperature Ingredients: Always use room temperature eggs and any dairy products to help the batter combine easily, resulting in a lighter cake.
  • Don’t Overmix: Mix until just combined to avoid dense cake. Overmixing can lead to a tough texture.
  • Check for Doneness: Insert a toothpick in the center of the cake; it should come out clean or with a few crumbs, not wet batter.
  • Cool Properly: Allow the cake to cool in the pan for about 10 minutes before inverting it on a wire rack to prevent breaking.
  • Make Ahead: This cake can be made a day in advance; just wrap it tightly in plastic wrap to keep it fresh.
  • Customize Your Glaze: Feel free to add a splash of bourbon or vanilla to the glaze for an extra layer of flavor.
  • Storage Tips: Store any leftovers in an airtight container at room temperature for up to 3 days or in the fridge for up to a week.
  • Freezing Instructions: You can freeze the cake unglazed for up to 3 months. Wrap it tightly in plastic wrap and foil. Defrost in the fridge overnight before glazing.

Common Mistakes and Troubleshooting

Side view of a moist pumpkin cake topped with a shiny maple glaze and crushed pistachios.

Even the best bakers encounter hiccups. Here’s how to avoid common pitfalls:

  • Dry Cake: If your cake comes out dry, it could be due to overbaking. Always set a timer and check a few minutes early.
  • Sunken Center: A cake sinking in the middle often indicates it was underbaked or had too much liquid. Ensure accurate measurements and baking time.
  • Too Dense: This can be from overmixing or using cold ingredients. Follow the pro tips to ensure the right texture.
  • Glaze Too Thin: If your maple glaze is too runny, add more sifted confectioners sugar until you reach your desired consistency.

Variations to Try

Get creative with these variations of the pumpkin cake recipe:

  • Pumpkin Cupcakes: Bake in cupcake liners for easy, portable treats. Adjust baking time to about 18-20 minutes.
  • Chocolate Chip Pumpkin Cake: Fold in 1 cup of chocolate chips for a delightful contrast of flavors.
  • Pumpkin Spice Latte Cake: Add 1 tablespoon of espresso powder for a coffee-flavored twist.
  • Layered Pumpkin Cake: Bake in two round pans and layer with cream cheese frosting for an elegant dessert.

Storage and Make-Ahead Instructions

To keep your pumpkin cake fresh and delicious:

  • Room Temperature Storage: Cover with plastic wrap and leave at room temperature for up to 3 days.
  • Refrigeration: For longer storage, refrigerate the wrapped cake for up to a week.
  • Freezing Instructions: Wrap the cake tightly in plastic wrap and aluminum foil. Freeze for up to 3 months, defrosting overnight in the fridge before serving.

Comprehensive FAQ

Got questions? I’ve got answers! Here are some frequently asked questions about this recipe:

  • Can I use fresh pumpkin instead of canned? Yes, but ensure it’s properly puréed and cooked until soft.
  • What can I substitute for eggs? Flax eggs (1 tbsp ground flaxseed + 2.5 tbsp water per egg) are a great vegan option.
  • How do I make the glaze thicker? Add more confectioners sugar until you reach your desired consistency.
  • Is it possible to make this cake gluten-free? Absolutely! Use a gluten-free flour blend in place of regular flour.
  • Can I add nuts to the cake? Yes, walnuts or pecans can be added for extra texture and flavor.
  • How do I prevent my cake from sticking to the pan? Grease the pan well and consider lining it with parchment paper.
  • Can I make this cake ahead of time? Yes, this cake stores well and can be made a day in advance.
  • What’s the best way to serve this cake? Serve it warm with a dollop of whipped cream or a scoop of vanilla ice cream for a decadent treat.

Nutrition Tips and Dietary Adaptations

Looking to adapt this recipe further? Here are some nutrition and dietary tips:

  • Lower Sugar Option: Substitute some of the sugar with applesauce for a natural sweetness.
  • Dairy-Free Option: Use almond milk or coconut milk instead of whole milk in the glaze.
  • Whole Grain Variation: Swap half of the all-purpose flour for whole wheat flour for added fiber.

Equipment Recommendations

Having the right tools can make a huge difference:

  • Mixing Bowls: Use large mixing bowls for easy blending of ingredients.
  • Measuring Cups and Spoons: Accurate measurements are key to baking success.
  • Rubber Spatula: Perfect for scraping down the sides of your bowl and folding ingredients together.
  • Bundt Pan: A non-stick bundt pan is ideal for this recipe, ensuring a beautiful cake release.

Serving Suggestions

To elevate your pumpkin cake experience:

  • Pair with Whipped Cream: A dollop of homemade whipped cream complements the spices beautifully.
  • Serve with Coffee: This cake is perfect alongside a hot cup of coffee or spiced chai.
  • Top with Candied Pecans: For added crunch and flavor, sprinkle candied pecans on top before serving.

As you embark on this delightful baking journey, remember that food is not just about sustenance; it’s about connection, culture, and sharing stories. This pumpkin cake is a celebration of all those things, a slice of autumn that brings warmth to our hearts and homes. Enjoy every bite, and happy baking!

Pumpkin Cake with a Maple Glaze

Prep Time 20 minutes
Cook Time 40 minutes
Total Time 1 hour
Servings 12 pieces
Calories 350
A moist and flavorful pumpkin cake topped with a sweet maple glaze, perfect for fall gatherings.

Ingredients

Dry Ingredients

  • 2 3/4 cups all purpose flour
  • 2 teaspoons ground cinnamon
  • 1 1/2 teaspoons baking soda
  • 1 1/4 teaspoons ground nutmeg
  • 1 teaspoon ground ginger
  • 1 teaspoon all-spice
  • 1 teaspoon salt
  • 1/2 teaspoon baking powder

Wet Ingredients

  • 1 cup vegetable oil
  • 1 1/2 cups light brown sugar
  • 1 cup pure cane sugar
  • 4 large eggs (room temperature)
  • 1 teaspoon vanilla extract or paste
  • 1 15 ounce can pure pumpkin puree
  • 3 tablespoons maple syrup
  • 3 tablespoons whole milk
  • 1 teaspoon vanilla extract or vanilla paste
  • 1 3/4 cups sifted confectioners sugar
  • pinch salt
  • 3 tablespoons chopped pistachios

Instructions 

  • Preheat oven to 350°F (175°C). Grease and flour a cake pan.
  • Mix dry ingredients in a bowl. In another bowl, combine wet ingredients.
  • Gradually add dry to wet, mixing until smooth. Pour batter into prepared pan.
  • Bake for 40 minutes or until a toothpick inserted comes out clean. Cool completely.
  • Prepare glaze by mixing confectioners sugar, maple syrup, milk, vanilla, and salt. Drizzle over cooled cake and sprinkle with pistachios.

Notes

For extra flavor, toast the pistachios before sprinkling on top.
Calories: 350kcal
Cost: $15
Course: Dessert
Cuisine: American
Keyword: pumpkin

Embark on a Culinary Adventure: The Joy of Apple Cinnamon Cottage Cheese Bake

Welcome to a delicious journey that combines health and comfort in one delightful dish. The High-Protein Apple Cinnamon Cottage Cheese Bake is more than just a recipe; it’s a passport to flavorful memories and nourishing experiences. With creamy cottage cheese, sweet apples, and warm spices, this bake is your new favorite way to start the day. Let’s dive into the world of flavors, nutrition, and creativity!

Why You’ll Love This Recipe

This recipe is not just a simple breakfast; it offers multiple benefits that will make it a staple in your kitchen.

  • High Protein Boost: Packed with protein from cottage cheese and eggs, this dish keeps you full longer, making it perfect for breakfast or a snack.
  • Versatile and Flexible: You can easily customize the flavors by adding your favorite fruits, nuts, or sweeteners, creating a unique dish every time.
  • Easy to Prepare: With just a few simple steps, you can whip up this delicious bake in no time, perfect for busy mornings.
  • Nutrient-Dense Ingredients: The combination of apples and cottage cheese provides essential vitamins and minerals, making it a healthy choice.
  • Deliciously Comforting: The warm spices and sweet flavors create a cozy dish that feels like a hug in every bite.

Ingredient Breakdown and Substitutions

Let’s explore the key ingredients that make this bake a standout, along with potential substitutions for dietary preferences.


Meal Prep Container Set

★ Recommended Kitchen Tool

Meal Prep Container Set

Make this recipe even easier with a quality Meal Prep Container Set — a must-have kitchen staple!


🛒 Check Price on Amazon →

As an Amazon Associate, we earn from qualifying purchases.
  • Cottage Cheese: The star of the show! Use low-fat or full-fat, depending on your dietary needs.
  • Eggs: They provide structure and fluffiness. If you’re vegan, try flax eggs as a substitute (1 tablespoon ground flaxseed mixed with 2.5 tablespoons water for each egg).
  • Apples: Choose firm, sweet varieties like Gala or Honeycrisp for the best flavor. For a twist, consider using pears or diced peaches.
  • Ground Cinnamon: This warm spice adds depth. Feel free to experiment with nutmeg or allspice for a different flavor profile.
  • Vanilla Extract: Adds a sweet aroma. You can substitute with almond extract if you prefer a nuttier taste.
  • Optional Sweeteners: Maple syrup or protein powder can enhance sweetness. You can also use honey or agave syrup depending on your preference.

How to Make High-Protein Apple Cinnamon Cottage Cheese Bake

Follow these simple steps to create your delicious bake:

  1. Preheat your oven to 350°F (175°C) and grease a small baking dish.
  2. In a mixing bowl, combine the cottage cheese, eggs, ground cinnamon, vanilla extract, and your chosen sweetener (if using).
  3. Gently fold in the diced apples until well-distributed.
  4. Pour the mixture into the prepared baking dish and spread evenly.
  5. Bake for 35–40 minutes, or until the center is set and the top is golden brown.
  6. Let it cool slightly before serving; enjoy warm or chilled!

Pro Tips for the Perfect Bake

Here are some expert tips to elevate your baking game:

  • Choose the Right Apples: Firm apples like Granny Smith provide a tart contrast to the sweet elements.
  • Don’t Overmix: When combining ingredients, mix just enough to blend to avoid a dense texture.
  • Adjust Baking Time: Ovens vary; check for doneness by inserting a toothpick in the center—if it comes out clean, it’s done!
  • Resting Time: Allow the bake to cool slightly to enhance flavors and make slicing easier.
  • Top with Extras: Consider adding a dollop of Greek yogurt or a sprinkle of nuts for extra crunch.
  • Experiment with Spices: Try adding cardamom or ginger for a unique twist on the classic flavor.
  • Batch Cooking: Make extra and store in the freezer for quick breakfasts throughout the week!
  • Check Consistency: If your mixture seems too thick, add a splash of milk to achieve your desired consistency.

Common Mistakes and Troubleshooting

Even the best chefs make mistakes! Here are some common pitfalls and how to avoid them:

  • Overbaking: Keep an eye on the bake; it can quickly go from perfect to dry. Use a timer!
  • Undercooked Center: If the outside looks done but the center is still wet, lower the oven temperature and bake longer.
  • Flavor Imbalance: If it’s too sweet or not sweet enough, adjust the sweetener next time to your taste.
  • Texture Issues: If your bake turns out dense, consider using less cottage cheese or more eggs to create a lighter texture.

Variations to Try

Feeling adventurous? Here are some variations to try:

  • Berry Bliss: Substitute apples with mixed berries for a refreshing twist.
  • Nutty Delight: Add chopped nuts like walnuts or pecans for added crunch and healthy fats.
  • Chocolate Chip: Fold in dark chocolate chips for a sweet, indulgent breakfast treat.
  • Savory Spin: Omit the sweetener and spices, and add spinach, cheese, and herbs for a savory bake.

Storage and Make-Ahead Instructions

This bake is perfect for meal prep! Here’s how to store it:

  • Refrigerator: Store leftovers in an airtight container for up to 5 days.
  • Freezer: Freeze portions in individual containers for up to 3 months. Thaw overnight in the refrigerator before reheating.
  • Reheating: Warm in the microwave or oven until heated through. Add a splash of milk if it seems dry.

Frequently Asked Questions

Here are some common questions about this delightful dish:

  • Can I use low-fat cottage cheese? Yes, it works great and still provides a creamy texture!
  • Is this recipe gluten-free? Yes, all ingredients are naturally gluten-free; just ensure your sweetener is as well.
  • Can I substitute eggs for a vegan option? Absolutely! Use flax eggs or applesauce as a binding agent.
  • How can I make it more flavorful? Experiment with spices or add citrus zest for a zingy kick.
  • Can I double the recipe? Yes, just use a larger baking dish and adjust the baking time accordingly.
  • What’s the best way to serve this? Serve warm with yogurt or a drizzle of honey for added flavor.
  • Can I make this in advance? Yes, it stores well in the refrigerator or freezer, making it perfect for meal prep.
  • Is it suitable for kids? Definitely! The sweet flavors and protein make it a healthy option for breakfast.

Nutritional Tips and Dietary Adaptations

This dish is versatile enough to cater to various dietary preferences:

  • Low Carb: Opt for fewer apples or use a sugar substitute to reduce carbs.
  • Dairy-Free: Use plant-based cottage cheese alternatives made from almonds or soy.
  • High Fiber: Add oats or chia seeds for an extra fiber boost to support digestion.
  • Protein-Packed: Consider adding additional protein powder for an even higher protein content.

Equipment Recommendations

To make this recipe, you’ll need:

  • Mixing Bowl: For combining ingredients.
  • Baking Dish: A small to medium-sized dish works best for even cooking.
  • Whisk: To blend eggs and cottage cheese smoothly.
  • Measuring Cups and Spoons: For accurate ingredient measurements.

Serving Suggestions

Complete your meal with these serving ideas:

  • Top with Yogurt: A dollop of Greek yogurt adds creaminess and extra protein.
  • Fresh Fruits: Serve with a side of fresh berries or banana slices for added nutrition.
  • Nut Butter Swirl: Drizzle almond or peanut butter on top for a nutty flavor.
  • Honey Drizzle: A touch of honey enhances sweetness and complements the spices.

Conclusion: A Flavorful Journey Awaits

As you embark on this culinary adventure with the High-Protein Apple Cinnamon Cottage Cheese Bake, remember that every bite carries a story of flavor, health, and creativity. This dish is not just about nourishment; it’s about sharing experiences and creating delicious memories. So, gather your ingredients, embrace your inner chef, and let this recipe take you on a delightful journey!

High-Protein Apple Cinnamon Cottage Cheese Bake

Prep Time 10 minutes
Cook Time 40 minutes
Total Time 50 minutes
Servings 2 servings
Calories 250
A quick and nutritious baked dish combining cottage cheese, apples, and cinnamon for a high-protein snack or breakfast.

Ingredients

Dairy

  • 1 cup cottage cheese
  • 2 eggs eggs

Fruits

  • 1 medium apple (diced)

Spices & Flavorings

  • 1 tsp ground cinnamon
  • 1 tsp vanilla extract
  • 1-2 tbsp maple syrup or protein powder (optional) (Adjust to taste)

Instructions 

  • Preheat oven to 350°F (175°C) and grease a small baking dish.
  • Mix cottage cheese, eggs, cinnamon, vanilla, and sweetener (if using).
  • Fold in diced apples.
  • Pour mixture into dish and bake for 35–40 mins.
  • Let cool and enjoy warm or chilled.

Notes

For extra sweetness, add more maple syrup or protein powder.
Calories: 250kcal
Cost: $15
Course: Breakfast
Cuisine: American
Keyword: High-Protein

Embark on a Flavor Journey with Pumpkin Spice Crispy Rice Treats

As the leaves turn golden and the air becomes crisp, there’s nothing quite like the cozy embrace of autumn flavors. Join me, Jack, on this delightful journey as we whip up a batch of Pumpkin Spice Crispy Rice Treats. These whimsical treats blend the warm, comforting notes of pumpkin spice with the satisfying crunch of crispy rice cereal. Perfect for sharing stories around the fire or savoring solo with a cup of tea, these treats are an invitation to taste the season!

Why You’ll Love This Recipe

Before we dive into the details, let’s explore why these Pumpkin Spice Rice Krispie Treats are destined to become a fall favorite:

  • Easy to Make: With just a handful of ingredients, you can whip these treats together in no time.
  • Versatile Treat: Perfect for parties, potlucks, or a cozy evening at home, they fit any occasion.
  • Flavorful Twist: The addition of pumpkin puree and spices transforms the classic rice krispie treat into something unique and seasonal.
  • Customizable: Add your favorite mix-ins or toppings to make them truly your own.
  • Kid-Friendly Fun: Get the little ones involved in the mixing and shaping for a delightful kitchen experience!

Ingredient Breakdown

Let’s gather our ingredients and get ready to create some magic!


Cake Decorating Set

★ Recommended Kitchen Tool

Cake Decorating Set

Make this recipe even easier with a quality Cake Decorating Set — a must-have kitchen staple!


🛒 View on Amazon →

As an Amazon Associate, we earn from qualifying purchases.
  • Unsalted Butter: 3 tablespoons, for that rich, buttery flavor. You can use coconut oil for a vegan option.
  • Canned Pumpkin Puree: 1/4 cup, the star ingredient that adds moisture and flavor.
  • Mini Marshmallows: 1 (10 oz.) bag, ensuring the treats hold together with that classic gooeyness.
  • Crispy Rice Cereal: 6 cups, the backbone of our treats.
  • White Chocolate (optional): 4 oz., for drizzling on top, adding a sweet finish.

Step-by-Step Instructions

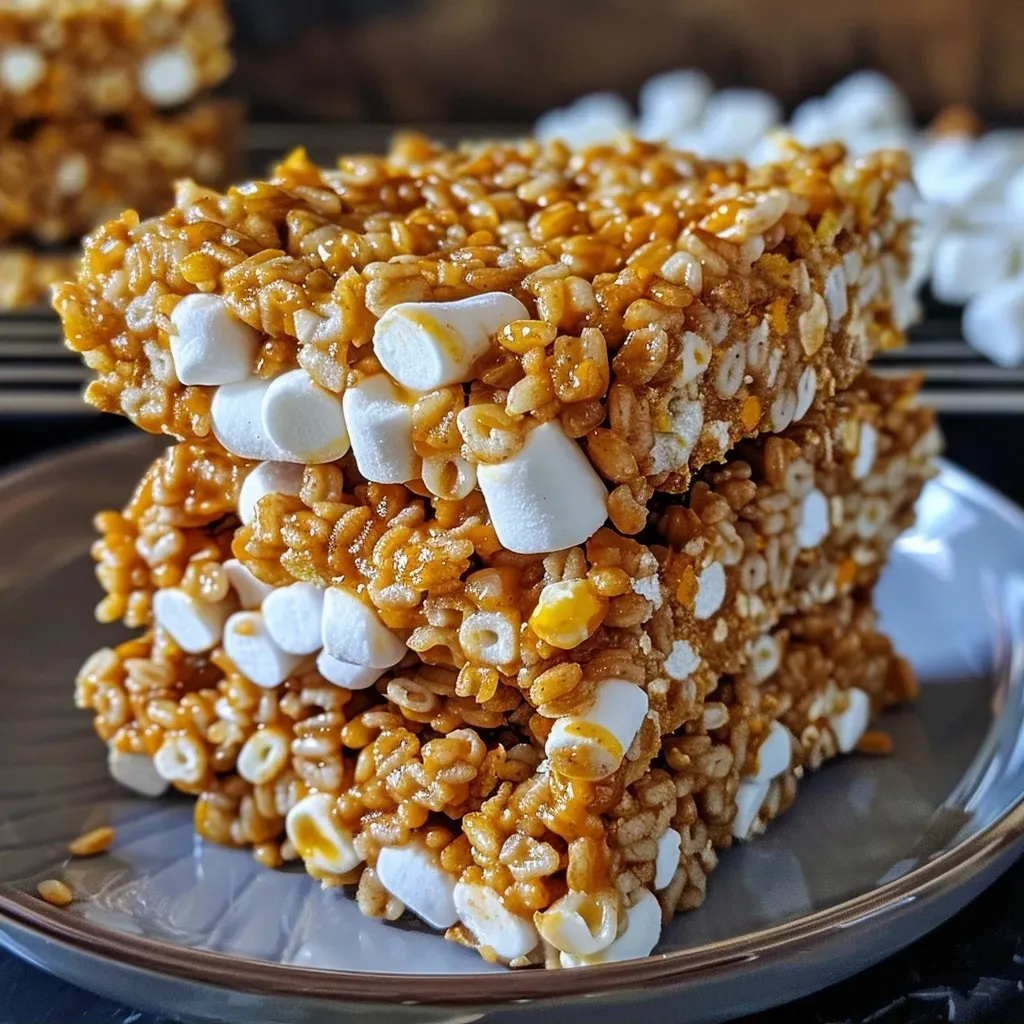
Close-up of Pumpkin Spice Crispy Rice Treats with a golden hue and marshmallow texture.

Now that we have everything, let’s get cooking!

  • Mix: Grease a 9×9 inch pan and set aside. In a large pot over medium-low heat, melt the butter. Add the pumpkin puree and stir for about 2 minutes until excess moisture evaporates.
  • Incorporate Marshmallows: Add the mini marshmallows and stir until completely melted. Mix in pumpkin pie spice and a pinch of Mayan sea salt to enhance the flavors.
  • Combine with Cereal: Remove the pot from heat and add the crispy rice cereal. Stir gently until fully coated.
  • Finish Up: Quickly pour the mixture into the prepared pan and spread it out evenly. Allow it to set for 30 minutes before cutting into squares. If you desire, melt the white chocolate and drizzle it on top for an extra touch of sweetness.

Pro Tips for Perfect Treats

To ensure your treats turn out perfectly every time, consider these expert insights:

  • Choose Fresh Ingredients: Ensure your marshmallows and cereal are fresh for the best texture.
  • Don’t Overheat: Keep the heat low when melting to prevent burning and maintain a creamy consistency.
  • Mix Gently: Stir the cereal in carefully to avoid crushing it, retaining that delightful crunch.
  • Use Parchment Paper: Lining the pan with parchment paper makes it easier to lift out the treats once set.
  • Experiment with Spices: Feel free to add nutmeg or cinnamon for an extra layer of flavor.
  • Allow to Cool: Patience is key! Let them cool completely for better cutting.
  • Keep an Eye on Time: If they set too long, they may become too hard to cut.
  • Store Properly: Keep them in an airtight container to maintain freshness.

Common Mistakes and Troubleshooting

Even the best chefs stumble sometimes! Here are some common pitfalls and how to avoid them:

  • Too Sticky: If the mixture is too sticky, ensure you’ve melted the marshmallows completely. Adding a tad more butter can help.
  • Too Hard: If your treats are hard, it could be due to overcooking the mixture. Adjust your heat next time.
  • Uneven Distribution: For consistent texture, make sure to mix the cereal thoroughly to coat every piece.
  • Crumbly Treats: If they won’t hold together, consider adding a touch more marshmallow or butter.

Delicious Variations to Try

Want to mix it up? Here are some fun variations to consider:

  • Chocolate Delight: Add chocolate chips to the mixture for a sweet surprise.
  • Nutty Crunch: Toss in chopped pecans or walnuts for added texture and flavor.
  • Dried Fruit Fusion: Incorporate dried cranberries or raisins for a fruity twist.
  • Spiced Up: Add cayenne pepper for a spicy kick that complements the sweetness.

Storage and Make-Ahead Instructions

These treats are perfect for preparing in advance:

  • Room Temperature: Store in an airtight container at room temperature for up to 3 days.
  • Refrigeration: For longer freshness, keep them in the fridge for up to a week.
  • Freezing: Wrap individual squares in plastic wrap and freeze for up to a month. Thaw at room temperature before enjoying.

Frequently Asked Questions

Got questions? I’ve got answers!

  • Can I use regular butter instead of unsalted? Yes, just reduce the added salt in the recipe.
  • What can I substitute for pumpkin puree? You can use sweet potato puree or butternut squash puree.
  • Are these treats vegan? They can be made vegan by using coconut oil and dairy-free marshmallows.
  • How can I make these gluten-free? Ensure your crispy rice cereal is labeled gluten-free.
  • Can I add chocolate to the recipe? Absolutely! Incorporate chocolate chips or drizzle melted chocolate on top.
  • How do I cut the treats without them crumbling? Use a sharp, non-serrated knife and cut slowly.
  • What can I do with leftovers? Crumble them over ice cream or yogurt for a delicious dessert.
  • Can I make these treats in advance? Yes! They store well and can be made a few days ahead of time.

Nutritional Information and Dietary Adaptations

These treats can be enjoyed as a fun dessert, but let’s look at how to make them a bit healthier:

  • Lower Sugar Option: Use less marshmallow or a sugar substitute to reduce sweetness.
  • Whole Grain Cereal: Opt for whole grain crispy rice for added nutritional value.
  • Add Fiber: Mix in chia seeds or flaxseeds for a fiber boost.

Essential Equipment for Success

To make your cooking experience seamless, here’s what you’ll need:

  • Large Pot: For melting the marshmallows and butter.
  • 9×9 Inch Baking Pan: Ideal for setting the treats.
  • Spatula: To mix and spread the cereal mixture evenly.
  • Measuring Cups and Spoons: For precise ingredient measurements.

Serving Suggestions

Serve your Pumpkin Spice Rice Krispie Treats with a side of hot apple cider or a pumpkin spice latte for the ultimate fall experience!

In conclusion, these delightful treats are more than just a dessert; they are a celebration of autumn, a mixture of tradition and creativity in every bite. So gather your friends and family, share the love of cooking, and enjoy the flavors of the season together. Happy cooking!

Pumpkin Spice Crispy Rice Treats

Prep Time 10 minutes
Cook Time 20 minutes
Total Time 30 minutes
Servings 9 pieces
Calories 250
A festive twist on classic rice treats, infused with pumpkin and warm spices for a seasonal delight.

Ingredients

Dairy

  • 3 Tbsp unsalted butter
  • 1/4 cup canned pumpkin puree
  • 1 10 oz. bag mini marshmallows
  • 6 cups crispy rice cereal
  • 4 oz. white chocolate (optional)

Instructions 

  • Grease a 9×9 pan and set aside. Melt butter in a large pot over medium-low heat.
  • Add pumpkin puree and stir for 2 minutes until moisture evaporates. Add marshmallows and stir until melted.
  • Stir in Pumpkin Pie Spice and Mayan Sea Salt. Remove from heat. Add crispy rice cereal and mix until combined.
  • Pour mixture into prepared pan and spread evenly. Let set for 30 minutes.
  • If desired, melt white chocolate and drizzle on top before serving.

Notes

For extra flavor, sprinkle with cinnamon or nutmeg before setting.
Calories: 250kcal
Cost: $12
Course: Dessert
Cuisine: American
Keyword: pumpkin

Embrace the Comfort of Garlicky Creamy Brussels Sprouts Au Gratin

Welcome to a culinary adventure that celebrates the humble yet delightful Brussels sprout! In this recipe for Garlicky Creamy Brussels Sprouts Au Gratin, we’ll transform these often-underappreciated vegetables into a comforting dish that’s bursting with flavor and rich textures. Join me, Jack, as we explore how to bring a little magic to your kitchen with this creamy, cheesy delight. Perfect for family gatherings or weeknight dinners, this dish is sure to impress!

Why You’ll Love This Recipe

  • Quick and Easy: This dish can be prepared in just 30 minutes, making it an ideal choice for busy weeknights or last-minute gatherings.
  • Flavor Explosion: The combination of garlic, cream, and three types of cheese creates a rich, indulgent flavor that elevates Brussels sprouts to new culinary heights.
  • Versatile Pairing: This creamy Brussels dish pairs wonderfully with chicken, beef, or turkey, making it a flexible addition to any meal.
  • Family-Friendly: Even the pickiest eaters will love this dish, thanks to its comforting, cheesy goodness and mouth-watering aroma.
  • Make-Ahead Friendly: Prepare this dish in advance and simply pop it in the oven when you’re ready to serve, allowing you more time to enjoy with your guests.

Ingredients Breakdown

To create your Garlicky Creamy Brussels Sprouts Au Gratin, gather the following ingredients:

  • 16 ounces Brussels sprouts: Cleaned and halved for even cooking. You can substitute with green beans or cauliflower for a twist.
  • 2 tablespoons butter: The base for sautéing garlic and adding richness. Olive oil can be used for a lighter option.
  • 3 cloves garlic: Minced to infuse flavor. Feel free to add more if you’re a garlic lover!
  • ½ cup heavy cream: This gives a luscious texture to the sauce. Half-and-half or coconut cream can be used as alternatives.
  • ½ teaspoon Kosher salt: Enhances all the flavors in the dish.
  • ¼ teaspoon black pepper: Adds a hint of spice. Adjust to taste.
  • ¼ teaspoon garlic powder: For an extra boost of garlic flavor.
  • ⅛ teaspoon nutmeg: This warm spice complements the creamy sauce beautifully.
  • ½ cup parmesan cheese: Shredded for a salty, nutty flavor.
  • 1 cup cheddar cheese: Shredded for its sharpness and creaminess.
  • 1 cup fontina cheese: Shredded for its melt-in-your-mouth texture.

How to Make Garlicky Creamy Brussels Sprouts Au Gratin

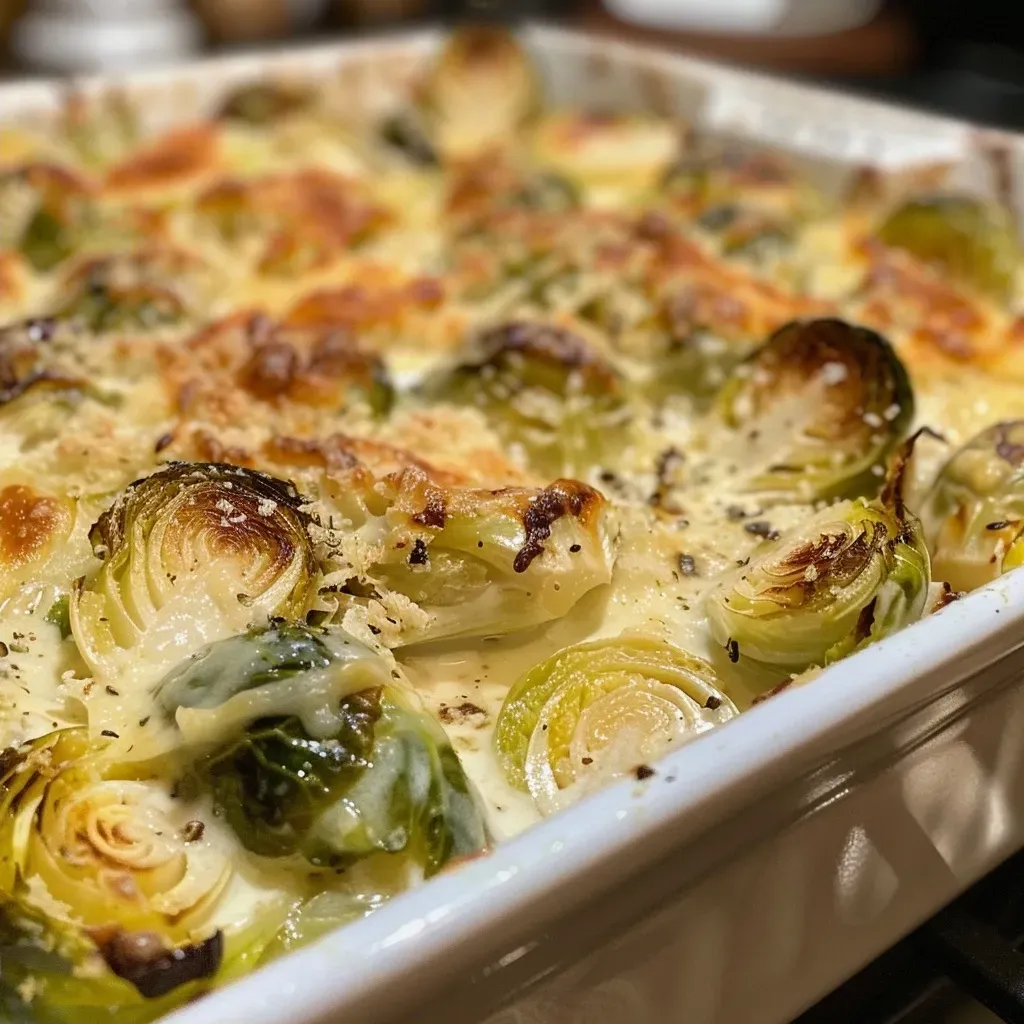
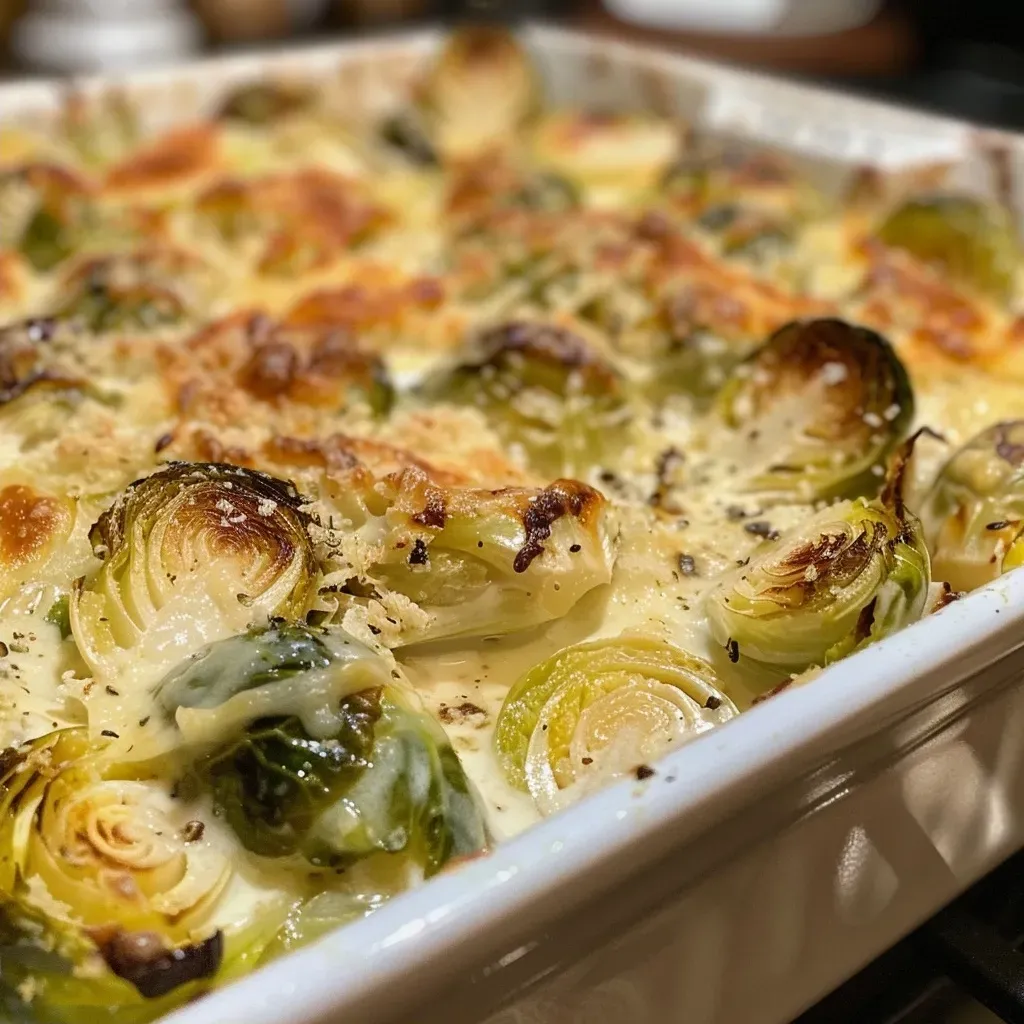
Close-up of creamy Brussels sprouts au gratin, topped with melted cheese.

Step 1: Preheat and Prep

Start by preheating your oven to 375°F (190°C). Clean and halve the Brussels sprouts, ensuring they are ready to soak up all that creamy goodness.


Professional Chef Knife Set

★ Recommended Kitchen Tool

Professional Chef Knife Set

Make this recipe even easier with a quality Professional Chef Knife Set — a must-have kitchen staple!


🛒 See Deals on Amazon →

As an Amazon Associate, we earn from qualifying purchases.

Step 2: Infuse the Garlic Flavor

In an oven-proof pan over medium heat, melt the butter. Once melted, add the minced garlic and sauté until fragrant but not browned, about 1-2 minutes. This step is crucial for deepening the dish’s flavor.

Step 3: Create the Cream Sauce

Stir in the heavy cream, salt, pepper, garlic powder, nutmeg, and half of the cheese mixture. This will become the luscious sauce that coats your sprouts.

Step 4: Combine and Coat

Add the Brussels sprouts to the pan and mix until they are evenly coated with the sauce. Spread them out in a single layer for even cooking.

Step 5: Top with Cheese and Bake

Sprinkle the remaining cheese on top of the sprouts. Place the pan in the preheated oven and bake for 18-25 minutes, until bubbly and golden brown. Your kitchen will be filled with an irresistible aroma!

Serving Suggestions

Once your Garlicky Creamy Brussels Sprouts Au Gratin is out of the oven, let it cool slightly before serving. This dish pairs beautifully with:

  • Roasted Chicken: The rich flavors complement each other perfectly.
  • Grilled Steak: A hearty protein that balances the creamy texture of the sprouts.
  • Vegetarian Options: Serve alongside quinoa salad or a hearty grain bowl for a satisfying meal.
  • Wine Pairing: A crisp white wine, like Chardonnay, enhances the cheesiness while cutting through the richness.

Pro Tips for the Perfect Dish

  • Choose Fresh Brussels: Look for firm, bright green sprouts with no brown spots for the best flavor.
  • Don’t Overcook: Be careful not to overcook the sprouts before baking; they should still have a slight crunch.
  • Experiment with Cheeses: Feel free to mix in your favorite cheeses, like gouda or smoked cheddar, for unique flavors.
  • Mind the Nutmeg: A little goes a long way; too much can overpower the dish.
  • Use a Cast Iron Skillet: For both cooking and serving, a cast iron skillet retains heat beautifully and looks rustic.
  • Make Ahead: Prepare the dish up to the baking stage, cover, and refrigerate. Bake when ready to serve.
  • Leftover Magic: Use leftovers in a pasta bake or as a topping for baked potatoes.
  • Garnish with Fresh Herbs: A sprinkle of parsley or chives adds a fresh touch and color.

Common Mistakes and Troubleshooting

  • Too Watery Sauce: Ensure you’re not adding too much cream; it should be thick enough to coat the sprouts.
  • Burnt Cheese Topping: If the top browns too quickly, cover it loosely with foil and continue baking.
  • Undercooked Sprouts: If they’re crunchy after baking, cover and return to the oven for a few more minutes.
  • Flavor Lacking: Adjust salt and pepper to taste. You can also add more garlic or cheese for intensity.

Variations to Try

  • Vegan Version: Substitute heavy cream with coconut milk and use vegan cheese or nutritional yeast for a dairy-free delight.
  • Spicy Twist: Add red pepper flakes to the garlic butter for a hint of heat.
  • Herb-Infused: Mix in fresh herbs like thyme or rosemary for an aromatic boost.
  • Different Veggies: Incorporate other vegetables like cauliflower or broccoli for added texture and flavor.

Storage and Make-Ahead Instructions

This dish can be made ahead of time and stored in the refrigerator for up to 2 days before baking. To store leftovers, place them in an airtight container and refrigerate for up to 4 days. Reheat in the oven at 350°F (175°C) until warmed through, about 15-20 minutes.

Frequently Asked Questions

  • Can I use frozen Brussels sprouts? Yes, but fresh sprouts yield the best texture and flavor.
  • How can I make this dish gluten-free? This recipe is naturally gluten-free; just ensure your cheese is gluten-free.
  • Can I freeze the leftovers? Yes, but the texture may change. Freeze in an airtight container for up to 2 months.
  • What can I pair this dish with? It pairs well with roasted meats, as well as vegetarian options like quinoa or grain salads.
  • Can I add meat to this dish? Yes! Cooked bacon or ham can be added for a savory twist.
  • What’s the best way to reheat? Reheat in the oven to retain the crispy cheese topping; microwave can make it soggy.
  • Can I make this recipe dairy-free? Yes, substitute cream with coconut milk and use dairy-free cheese.
  • What’s the cooking time for larger batches? If doubling the recipe, you may need to increase baking time slightly; check for doneness.

Nutritional Tips and Dietary Adaptations

For a lighter version, consider using half-and-half instead of heavy cream or reducing the cheese quantity. You can also add more vegetables to increase fiber and nutrients. Pairing this dish with a fresh green salad can enhance its nutritional profile and balance out the richness.

Essential Equipment Recommendations

To achieve the best results, here’s a list of equipment that will make your cooking process easier:

  • Oven-Proof Skillet: Perfect for both cooking and baking.
  • Sharp Knife: Essential for evenly halving your Brussels sprouts.
  • Cheese Grater: For freshly shredded cheese that melts beautifully.
  • Measuring Cups and Spoons: Accurate measurements ensure consistent results.

Conclusion: Your Culinary Adventure Awaits!

Now that you have the ultimate recipe for Garlicky Creamy Brussels Sprouts Au Gratin, it’s time to embark on your culinary journey! This dish is not just about the flavors; it’s about the stories you will share around the table with those you love. Remember, cooking is a passport to culture and connection. So, grab your apron, let your adventurous spirit guide you, and create something delicious that will be cherished by friends and family alike!

Garlicky Creamy Brussels Sprouts Au Gratin

Prep Time 10 minutes
Cook Time 20 minutes
Total Time 30 minutes
Servings 4 servings
Calories 350
A rich and flavorful side dish featuring tender Brussels sprouts baked in a creamy, cheesy garlic sauce.

Ingredients

Main

  • 16 ounces Brussels sprouts (cleaned and halved)
  • 2 tablespoons butter
  • 3 cloves garlic (minced)
  • ½ cup heavy cream
  • ½ teaspoon Kosher salt
  • ¼ teaspoon black pepper
  • ¼ teaspoon garlic powder
  • teaspoon nutmeg
  • ½ cup parmesan cheese (shredded)
  • 1 cup cheddar cheese (shredded)
  • 1 cup fontina cheese (shredded)

Instructions 

  • Preheat oven to 375°F (190°C).
  • Shred cheeses and mix in a bowl.
  • Melt butter and sauté garlic, then add cream, salt, pepper, garlic powder, nutmeg, and half the cheese mixture.
  • Add Brussels sprouts, coat with sauce, spread in pan, and sprinkle remaining cheese on top.
  • Bake for 18-25 minutes until bubbly and golden.

Notes

For extra flavor, sprinkle with fresh herbs before serving.
Calories: 350kcal
Cost: $15
Course: Side Dish
Cuisine: American
Keyword: Brussels Sprouts

Discover the Season’s Best: Pumpkin Spice Ice Cream

As the leaves begin to turn and the air grows crisp, nothing quite captures the essence of autumn like a scoop of homemade pumpkin spice ice cream. This delightful treat blends rich pumpkin puree and warm spices, creating a creamy dessert that feels like a cozy hug. Whether you’re hosting a festive gathering or simply looking for a sweet indulgence, our pumpkin spice ice cream is sure to impress. Ready to dive into this culinary adventure? Let’s explore the magic behind this seasonal sensation!

Why You’ll Love This Recipe

There are countless reasons to fall in love with this pumpkin spice ice cream, and here are just a few:

  • Seasonal Flavor: Embrace the taste of fall with every spoonful, featuring the warm spices that make autumn so special.
  • Customizable: Easily adjust the ingredients or add your favorite mix-ins for a unique twist.
  • No Special Equipment Required: With simple kitchen tools, you can create this creamy delight without needing an ice cream maker.
  • Perfect for Any Occasion: Whether it’s a holiday celebration or a quiet evening at home, this dessert fits right in.
  • Impressive & Delicious: Serve it at gatherings to wow your guests with a homemade treat that tastes gourmet!

Ingredients Breakdown

To create your pumpkin spice ice cream, gather the following ingredients:


Professional Chef Knife Set

★ Recommended Kitchen Tool

Professional Chef Knife Set

Make this recipe even easier with a quality Professional Chef Knife Set — a must-have kitchen staple!


🛒 View on Amazon →

As an Amazon Associate, we earn from qualifying purchases.
  • 2 cups heavy cream: For a rich and creamy base that provides a velvety texture.
  • 1 cup whole milk: Balances the richness of the heavy cream, making the ice cream smooth.
  • 1 cup unsweetened pumpkin puree: This key ingredient brings the signature pumpkin flavor.
  • 3/4 cup granulated sugar: Sweetens the mixture and enhances the overall flavor.
  • 1 teaspoon vanilla extract: Adds depth and aroma to the ice cream.
  • 1 teaspoon ground cinnamon: A classic spice that evokes the warmth of autumn.
  • 1/2 teaspoon ground ginger: Provides a subtle heat that complements the pumpkin.
  • 1/4 teaspoon nutmeg: Enhances the spiced flavor profile.
  • 1/4 teaspoon ground cloves: A little goes a long way in contributing to the overall warmth.
  • 1/4 teaspoon kosher salt: Balances sweetness and elevates the flavors.

Substitutions: If you’re looking to modify the recipe, consider these alternatives:

  • Low-fat milk: Use in place of whole milk for a lighter version.
  • Maple syrup: Swap granulated sugar for maple syrup for a distinct flavor.
  • Dairy-free options: Substitute coconut cream and almond milk for a vegan-friendly treat.
  • Additional spices: Try adding cardamom or allspice for a unique flavor twist.

Pro Tips for Perfect Pumpkin Spice Ice Cream

Close-up of creamy Pumpkin Spice Ice Cream in a bowl.

To ensure your ice cream turns out perfectly every time, keep these expert insights in mind:

  • Chill your ice cream bowl: Place your bowl in the freezer for at least 24 hours before churning to achieve optimal texture.
  • Whisk thoroughly: Make sure the sugar is completely dissolved in the mixture for a smooth ice cream.
  • Don’t rush the churning: Follow your ice cream maker’s instructions and churn until thick and fluffy.
  • Cover properly: When storing, press plastic wrap against the surface of the ice cream to minimize ice crystals.
  • Let it soften: Allow the ice cream to sit at room temperature for 5 minutes before scooping for easier serving.
  • Experiment with add-ins: Stir in chocolate chips, crushed graham crackers, or caramel swirls for added texture and flavor.
  • Make it a float: Serve with a splash of warm apple cider for a cozy fall drink.
  • Pair with pumpkin pie: Serve alongside your favorite pumpkin pie for a delightful dessert duo.

Common Mistakes and Troubleshooting

Even the most seasoned home chefs can run into problems. Here’s how to troubleshoot:

  • Ice cream is too hard: If it’s rock solid, let it sit at room temperature for a few minutes before serving.
  • Crystallization: Ensure your mixture is well-blended and use proper storage techniques to avoid ice crystals.
  • Not enough pumpkin flavor: If the pumpkin taste is subtle, try increasing the amount of puree or spices next time.

Delicious Variations

Want to switch things up? Here are some fun variations to try:

  • No-churn pumpkin spice ice cream: Combine ingredients, pour into a container, and freeze without churning.
  • Pumpkin pie ice cream: Add crushed graham crackers and a swirl of pie filling for a pie-inspired treat.
  • Spiced rum pumpkin ice cream: Incorporate a splash of spiced rum for an adult twist.
  • Chocolate pumpkin ice cream: Swirl in melted chocolate for a rich, indulgent flavor.

Storage and Make-Ahead Instructions

If you want to prepare in advance, it’s simple:

  • Storage: Transfer the ice cream to an airtight container and freeze for up to 2 weeks.
  • Make-ahead: Prepare the ice cream mixture 1-2 days before serving for optimal flavor.
  • Serving: Let the ice cream sit for a few minutes to soften before scooping for the best texture.

Frequently Asked Questions

You’re not alone in your culinary journey! Here are some common questions:

  • Can I make this ice cream without an ice cream maker? Yes! Simply use the no-churn method described earlier.
  • How long will this ice cream last? It’s best enjoyed within 2 weeks for optimal flavor and texture.
  • Can I use fresh pumpkin instead of canned? Absolutely! Just ensure it’s well-pureed and cooked for the best results.
  • What’s the best way to serve pumpkin spice ice cream? Serve it in bowls topped with whipped cream or alongside warm desserts.
  • Can I adjust the sweetness? Yes, feel free to add more or less sugar based on your preference.
  • What if my ice cream is too soft? If it’s too soft after churning, refreeze it for an additional hour to firm up.
  • Is it possible to make this ice cream dairy-free? Yes! Use coconut cream and a plant-based milk for a dairy-free option.
  • Can I add alcohol to this recipe? Yes, adding a splash of bourbon or rum can enhance the flavor profile.

Nutritional Tips and Dietary Adaptations

If you’re watching your diet, here are some tips for adapting the recipe:

  • Reduce sugar: Use a sugar substitute or reduce the amount of granulated sugar for a lighter dessert.
  • Low-calorie options: Swap heavy cream for a lighter cream or non-dairy alternative.
  • Incorporate protein: Add protein powder for a post-workout treat that satisfies your sweet tooth.

Equipment Recommendations

For the best results, consider using:

  • Ice cream maker: A good-quality ice cream maker makes the churning process easy and effective.
  • Mixing bowls: Use large, sturdy bowls for mixing your ingredients.
  • Storage containers: Airtight containers are essential for keeping your ice cream fresh.

Serving Suggestions

Ready to serve? Here are some delightful pairings:

  • Warm desserts: Pair with a slice of warm pumpkin pie or apple crisp for a comforting contrast.
  • Festive toppings: Top with caramel drizzle, chopped pecans, or a dollop of whipped cream.
  • Autumn-inspired drinks: Serve alongside warm chai tea or spiced cider for a seasonal treat.

Conclusion

And there you have it! A journey into the heart of autumn with our creamy, dreamy pumpkin spice ice cream. This recipe is more than just a dessert; it’s a celebration of flavors, culture, and the joys of the season. So gather your ingredients, summon your inner chef, and indulge in a scoop (or two) of this delightful treat. Thank you for joining me on this culinary adventure—here’s to delicious memories and the warmth of homemade ice cream!

Pumpkin Spice Ice Cream

Prep Time 15 minutes
Cook Time 25 minutes
Total Time 40 minutes
Servings 8 servings
Calories 250
A creamy, spiced pumpkin ice cream perfect for fall treats. Easy to make at home with simple ingredients.

Ingredients

Dairy

  • 2 cups heavy cream
  • 1 cup whole milk
  • 1 cup Pumpkin Puree (unsweetened)
  • 3/4 cup Sugar (granulated)
  • 1 teaspoon Vanilla Extract
  • 1 teaspoon Ground Cinnamon
  • 1/2 teaspoon Ground Ginger
  • 1/4 teaspoon Nutmeg
  • 1/4 teaspoon Ground Cloves
  • 1/4 teaspoon Kosher Salt

Instructions 

  • Chill the ice cream bowl for 24 hours.
  • Mix all ingredients in a large bowl and whisk until sugar dissolves.
  • Churn in an ice cream machine for about 25 minutes until thick.
  • Spoon into a container, cover, and freeze for 4 hours.
  • Let sit at room temperature for 5 minutes before serving.

Notes

For a richer flavor, use fresh spices and high-quality pumpkin puree.
Calories: 250kcal
Cost: $15
Course: Dessert
Cuisine: American
Keyword: pumpkin

Embark on a Culinary Journey with the Wild Rice Mushroom Medley

Welcome, fellow food explorers! Today, we’re diving into a delightful dish that promises to transport your taste buds to a world where earthy flavors meet nutty goodness. Our Wild Rice Mushroom Medley is not just a recipe; it’s a story of nature’s bounty, a celebration of ingredients that blend seamlessly to create a meal that’s both comforting and nourishing.

This dish combines the rich textures of wild rice with the savory depth of mushrooms, making it a versatile option for both weeknight dinners and special occasions. Whether you’re looking for a hearty side or a standalone vegetarian main course, this medley will surely impress. Let’s get started!

Why You’ll Love This Recipe

This medley is more than just a dish; it’s an experience. Here are some compelling reasons to add this recipe to your culinary repertoire:


Digital Kitchen Scale

★ Recommended Kitchen Tool

Digital Kitchen Scale

Make this recipe even easier with a quality Digital Kitchen Scale — a must-have kitchen staple!


🛒 Shop This Tool →

As an Amazon Associate, we earn from qualifying purchases.
  • Nutritious and Wholesome: Wild rice is a nutritional powerhouse, packed with antioxidants, fiber, and protein. Combined with mushrooms, which provide essential vitamins and minerals, this dish supports overall health.
  • Flavor Fusion: The nutty, chewy texture of wild rice contrasts beautifully with the tender, juicy bites of mushrooms, creating a harmonious flavor profile that’s hard to resist.
  • Versatile Meal Prep: Use this recipe as a base to create various meals. Pair it with grilled chicken, roasted vegetables, or enjoy it on its own for a filling vegetarian option.
  • Easy to Make: With simple steps and readily available ingredients, you can whip up this comforting dish in no time, making it perfect for busy weeknights.
  • Customizable: With numerous variations and substitutions available, you can tailor this recipe to suit your taste or dietary needs.

Key Ingredients for the Wild Rice Mushroom Medley

Let’s break down the essential components of this dish, along with some fantastic substitutions to suit your pantry:

  • 1 cup wild rice: A unique grain that adds a nutty flavor and chewy texture. If unavailable, you can substitute with brown rice or quinoa for a different twist.
  • 8 ounces fresh mushrooms (cremini or shiitake), sliced: These mushrooms bring a rich umami flavor. Feel free to mix different varieties for added depth!
  • 1 medium yellow onion, finely chopped: Adds sweetness and depth. Red or shallots can also work well.
  • 3 cloves garlic, minced: A must for aromatic depth. You can use garlic powder if you’re in a pinch.
  • 3 cups low-sodium vegetable broth: The cooking liquid that infuses the rice with flavor. Chicken broth is a great substitute if you’re not vegetarian.
  • 2 tablespoons unsalted butter or olive oil: For sautéing the onions and mushrooms. Coconut oil can be used for a dairy-free option.
  • 1 teaspoon dried thyme (or parsley): Adds an herbal touch. Fresh herbs can elevate the flavors even more!
  • Salt and pepper to taste: Essential for seasoning, adjust to your preference.

Step-by-Step Instructions to Create Your Masterpiece

Close-up view of a delicious Wild Rice Mushroom Medley with visible mushrooms and rice.

Follow these steps to create a delicious Wild Rice Mushroom Medley:

  1. Rinse the wild rice under cold water until clear. Chop the onion and mince the garlic.
  2. In a large skillet over medium heat, melt the butter or heat olive oil. Add the onion and sauté until translucent (about 5 minutes). Stir in the garlic.
  3. Add sliced mushrooms and cook until softened (around 4 minutes). Then stir in the rinsed wild rice.
  4. Pour in the vegetable broth, season with salt, pepper, and thyme. Bring to a boil, then reduce the heat to low.
  5. Cover and simmer for about 45 minutes, or until the liquid is absorbed and the rice is tender.
  6. Remove from heat, let sit covered for 10 minutes, then fluff with a fork before serving.

Pro Tips for the Best Wild Rice Mushroom Medley

Enhance your cooking experience with these expert insights:

  • Cooking Wild Rice: Wild rice takes longer to cook than white rice. Be patient, and ensure you keep an eye on the liquid levels.
  • Mix of Mushrooms: For added flavor, consider using a mix of different mushrooms, such as portobello and oyster mushrooms.
  • Herb Variations: Experiment with fresh herbs! Basil, oregano, or even a sprinkle of dill can provide an exciting twist.
  • Make it Creamy: Stir in a splash of cream or a dollop of sour cream before serving for a richer texture.
  • Leftovers: This dish tastes even better the next day! Store in the fridge for up to 3 days.

Avoid These Common Mistakes

As you embark on your cooking journey, here are some pitfalls to watch out for:

  • Not Rinsing the Rice: Skipping this step can lead to a gritty texture. Rinse thoroughly!
  • Overcooking Mushrooms: Mushrooms should be tender but not mushy. Keep an eye on them while sautéing.
  • Ignoring Seasoning: Taste as you go! Adjust the seasoning to elevate the dish.
  • Skipping the Resting Phase: Letting the dish sit covered allows the flavors to meld beautifully.

Delicious Variations to Try

Feel free to get creative with this dish! Here are some variations you might enjoy:

  • Wild Rice and Spinach Medley: Stir in fresh spinach just before serving for a pop of color and nutrients.
  • Spicy Mushroom Medley: Add a pinch of red pepper flakes or diced jalapeños for a kick.
  • Asian-Inspired Dish: Swap vegetable broth for miso broth and add soy sauce and sesame oil for a unique twist.
  • Nutty Addition: Toss in some toasted walnuts or pecans for an extra crunch and flavor contrast.

Storage and Make-Ahead Instructions

Planning ahead? Here’s how to store and prepare this dish for later use:

  • Refrigeration: Store leftovers in an airtight container in the fridge for up to 3 days.
  • Freezing: You can freeze the medley for up to 2 months. Thaw overnight in the fridge before reheating.
  • Make-Ahead: Prepare the dish a day in advance, but add any fresh ingredients like herbs right before serving.

Frequently Asked Questions

Here are some common queries regarding the Wild Rice Mushroom Medley:

  • Can I use brown rice instead of wild rice? Yes, but note that it will alter the cooking time and texture.
  • Is this dish gluten-free? Absolutely! All the ingredients are naturally gluten-free.
  • How can I add protein to this dish? Consider adding cooked chicken, tofu, or chickpeas.
  • What other vegetables can I include? Carrots, bell peppers, or zucchini would work beautifully!
  • Can I make this dish vegan? Yes! Just use olive oil and vegetable broth.
  • How do I enhance the flavor? Experiment with different herbs and spices, or add a splash of balsamic vinegar.
  • Can I prepare this dish in advance? Yes! It stores well in the refrigerator and tastes great the next day.
  • What should I serve it with? It pairs wonderfully with grilled meats, roasted veggies, or as a filling standalone meal.

Nutritional Tips and Dietary Adaptations

For those watching their dietary intake, here are some nutritional considerations:

  • Low-Calorie Option: This dish is low in calories, making it a great choice for weight management.
  • Heart-Healthy: Rich in fiber and antioxidants, it promotes heart health.
  • Vegetarian and Vegan-Friendly: Naturally fits into plant-based diets.
  • Allergy-Friendly: Free from common allergens like gluten, soy, and dairy.

Equipment Recommendations

To ensure a smooth cooking process, here are some essential tools:

  • Large Skillet: For sautéing and simmering your ingredients.
  • Measuring Cups and Spoons: Precision in your ingredients leads to better results!
  • Sharp Knife: For chopping vegetables efficiently.
  • Wooden Spoon: Ideal for stirring without scratching your cookware.

Serving Suggestions for the Wild Rice Mushroom Medley

Wondering how to plate this delicious dish? Here are some serving ideas:

  • Elegant Side Dish: Serve alongside grilled meats or roasted fish for a balanced meal.
  • Standalone Meal: Top with a fried egg or avocado for a hearty vegetarian dish.
  • Garnish: A sprinkle of fresh herbs or a dash of cheese can elevate the presentation.

In conclusion, the Wild Rice Mushroom Medley is more than just a meal; it’s an invitation to explore flavors, cultures, and culinary creativity. Whether you’re an experienced chef or a novice cook, this dish is sure to become a beloved addition to your kitchen. So grab your apron, gather your ingredients, and let’s create something extraordinary together!

Wild Rice Mushroom Medley

Prep Time 10 minutes
Cook Time 45 minutes
Total Time 55 minutes
Servings 4 servings
Calories 350
A hearty and flavorful dish combining nutty wild rice with savory mushrooms and herbs, perfect for a comforting meal.

Ingredients

Main

  • 1 cup wild rice
  • 8 ounces fresh mushrooms (cremini or shiitake), sliced
  • 1 medium yellow onion, finely chopped
  • 3 cloves garlic, minced
  • 3 cups low-sodium vegetable broth
  • 2 tablespoons unsalted butter or olive oil
  • 1 teaspoon dried thyme (or parsley)
  • to taste salt and pepper salt and pepper

Instructions 

  • Rinse wild rice under cold water. Chop onion and mince garlic.
  • In a skillet, melt butter or heat oil. Sauté onion until translucent, then add garlic.
  • Add mushrooms and cook until softened. Stir in wild rice.
  • Pour in broth, season with salt, pepper, thyme. Bring to boil, then simmer covered for 45 minutes.
  • Let sit covered for 10 minutes, then fluff and serve.

Notes

For extra flavor, add fresh herbs or a splash of white wine during cooking.
Calories: 350kcal
Cost: $15
Course: Main Course
Cuisine: American
Keyword: Mushrooms, wild rice